
Your latest Node.js content, news and updates in one place.
In December 2019, I sadly dislocated my shoulder.
During the recovery process, as part of the therapy, my doctor recommended some exercises, but those were extremely boring. Subsequently, I decided to make the recovery fun and interactive.
Based on that, I took those exercises and mixed them with hardware and software to create a rehabilitation game. In order to make therapy fun, the application needed to transfer data in real-time to give the user a comfortable interaction with the game. A lot of references recommend Node.js and WebSocket for that, and many questions arose.
Why are these tools useful? What characteristics do they have? In which scenario is it recommended to be used? How do they help us in the process of building real-time applications?
The following article takes each tool, identifies the main characteristics, and explains how each concept works. Then, as a conclusion, you can learn how these pieces work together and highlight important considerations of their use.
Node.js
Node.js is a JavaScript runtime environment designed to build scalable network applications. Most of the time we used to hear the facts that Node is non-blocking, single-threaded, asynchronous, concurrent... But, what does it really mean in this context? Let’s discover it.
What is single-thread?
Node.js is single-threaded. One thread means one call stack, one call stack means one thing at a time.

Hmm, that's suspicious. If we want things in real-time, doing only one thing at a time does not sound like a good approach, right? Let's find out!
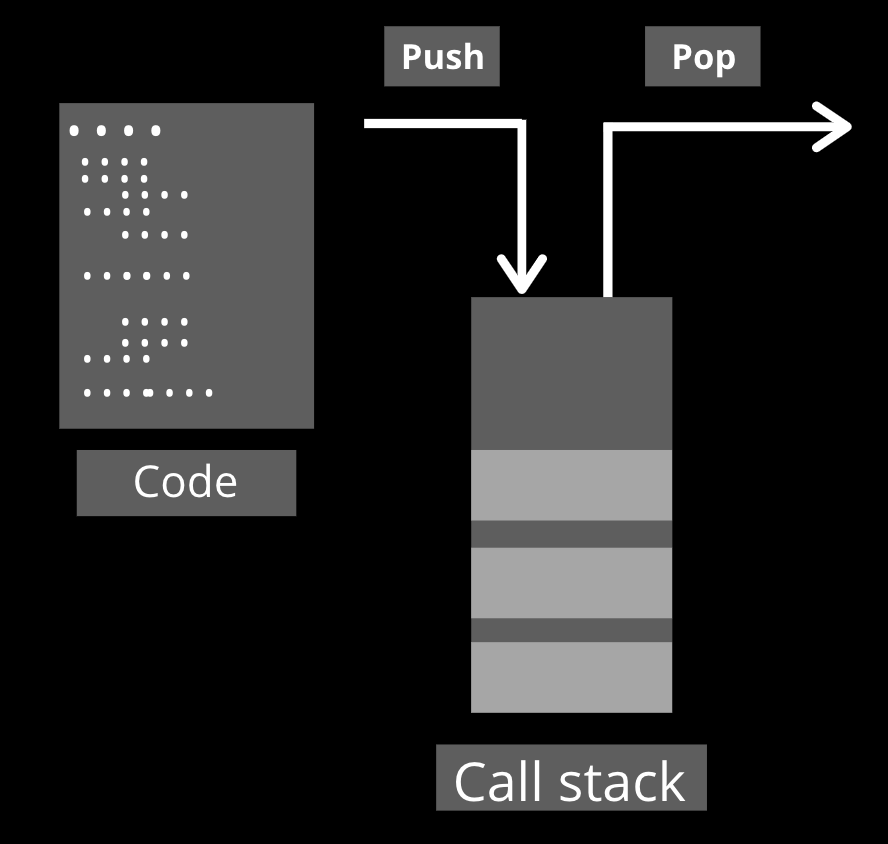
What is the call stack?
The call stack is a data structure that follows the LIFO approach (“Last In, First Out”), so basically what it does is push and pop different instructions read from the code. It is a very important piece of Node.js because it will store the execution order of the program and we should take special consideration with it because as there is only one if it is busy our application will be busy.
What is non-blocking?
Non-blocking is one of those concepts which are easier to understand if we understand first their opposite. Having said that, the concept of blocking refers to all those instructions that block the execution of others until that instruction finishes. Otherwise, non-blocking are instructions that can be done without blocking any other instruction.
Taken into consideration that our goal is to build applications that transfer data in real-time, the fact that JavaScript is a blocking language can surprise us. Fortunately, we can "make it” non-blocking by introducing the concepts of asynchronous and event loop.
What is asynchronous?
In JavaScript, asynchronous is the relation between now and later. But later does not mean after now. It means at one point in the future, a moment that you would not necessarily know when it will be.
Because of its definition and remembering what single-thread means if we don’t have certainty about when our asynchronous task will be done, having those into the call stack will slow down the performance of the application. For that reason, those are executed in the form of “promises” or “callbacks” out of the call stack by default.
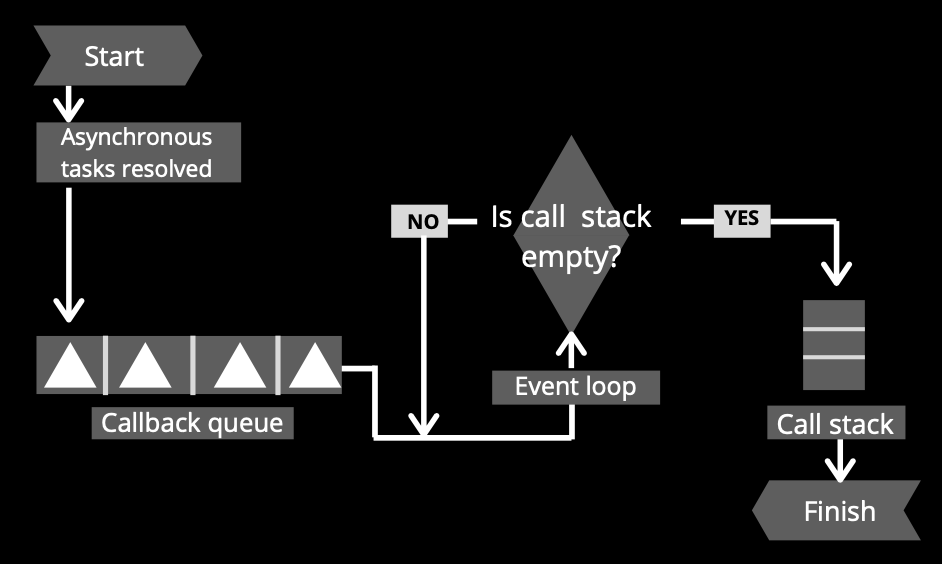
When the asynchronous instructions are resolved, they need to return to the call stack, and for that, they follow a route that visits two other processes before: first the callback queue, and then the event loop.
What is the callback queue?
The callback queue is a “first in first out” (FIFO) data structure type that receives and stores momentarily, resolved asynchronous code and because of that, it is a crucial support to the event loop.
What is the event loop?
The event loop is a very simple but important part of how Node.js works. It is a continuously looping process where the main goal is to pass an instruction to the call stack from the callback queue but only if the call stack is empty.
What is concurrency?
Concurrency is when two or more processes run together but not at the same time, it means that the execution “jumps” between processes. Even when Node.js is single-threaded, it supports thousands of concurrent connections with a single server.
This happens because Node.js offloads I/O operations to the system kernel whenever possible and most of the modern operating systems’ kernels are multi-threaded. This way, Node.js can handle one JavaScript operation at a time but a lot of I/O operations at the same time.
Putting pieces together
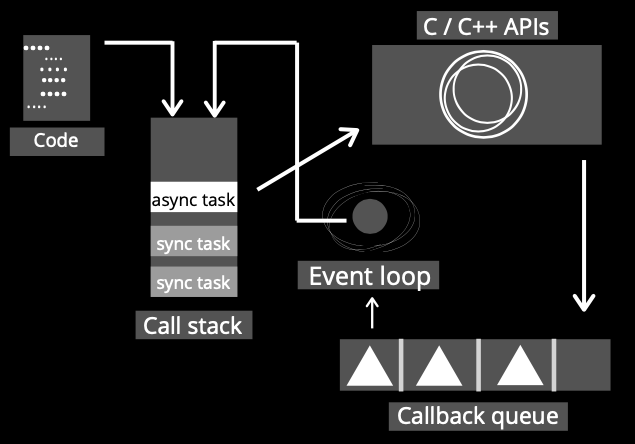
Our applications can have tons of instructions, some of them could be “fast” to execute such as it is an assign (assigning a value to a variable) but there are others that can be kind of “slow” e.g. network requests.
Regarding the facts that Node.js is single-thread and JavaScript is a blocking language we could assume that if our application needs to make a lot of “slow” instructions, the call stack will be busy and the performance of the app will decrease, but there is where the relevance of Node.js lies because it brings a different approach to face that scenario based on its other features.
Taking into consideration the concepts of non-blocking and asynchronous, the “slow” instructions can be executed as promises or callbacks, and this way those will be taken off from the call stack and delegate the execution of them to “someone” with the capacity to deal with it.
Once the “slow” instruction is resolved, it will return to the call stack by the functionality of the callback queue and the event loop. Thus, the “slow” tasks can be done without saturating the call stack and without affecting the performance of the app.
Having described the principal parts of Node.js and how those work together, let’s do the same now with the WebSocket protocol.
WebSocket
WebSockets came to facilitate the process of building applications in real-time because it is a protocol designed to establish persistent bidirectional communication between a client and a server by a TCP connection.
Its functionality allows both parties to have a persistent “conversation” by first establishing a connection with an initial “handshake” and then by sending bidirectionally the packages to exchange.
Let’s detail other pieces related to this protocol such as its API, lifecycle, scalability, and more.
What is a protocol?
A protocol is a set of syntaxes, rules, and semantics that allow two or more entities or machines to transmit information. Communication worldwide will not be possible without those standards. Some of them are TCP, MQTT, HTTPS, and of course WebSocket.
What is real-time data transfer?
Real-time data transfer consists of basically delivered data immediately after collection without delays in the transmissions of them. It's very used nowadays in a lot of applications such as chats, navigation, gaming, tracking, and so on. By the persistent and bidirectional WebSocket’s connection, the exchange of packages in a few steps is possible, which facilitates the real-time data transfer between applications.
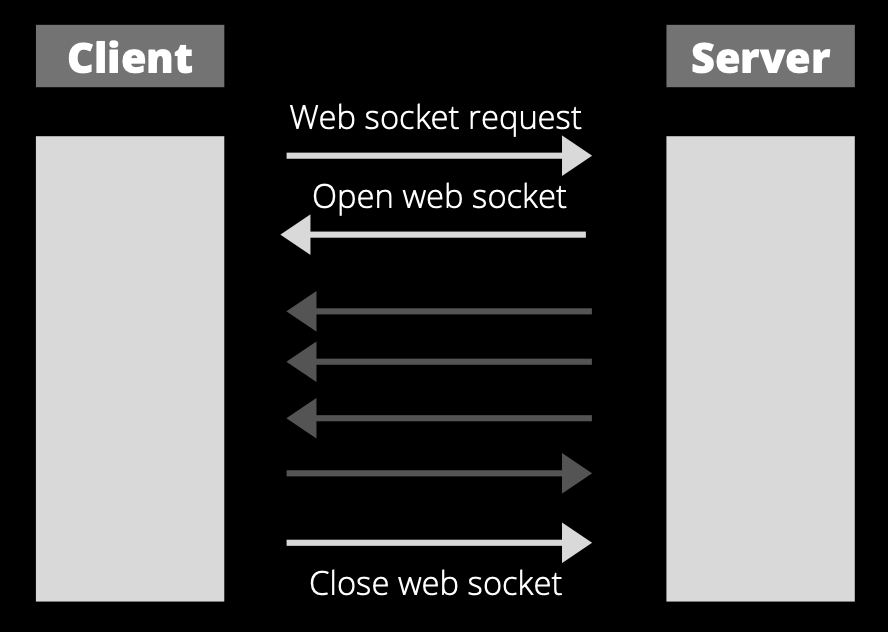
WebSockets’ connection lifecycle
The lifecycle of a WebSockets’ connection can be divided into 3 phases, the first step starts with requesting the establishment of a connection. Then, after the connection was established, the protocol is able to transfer packages bidirectional between sides. And at last, when for some reason there is not required to exchange more data, the connection needs to be closed.
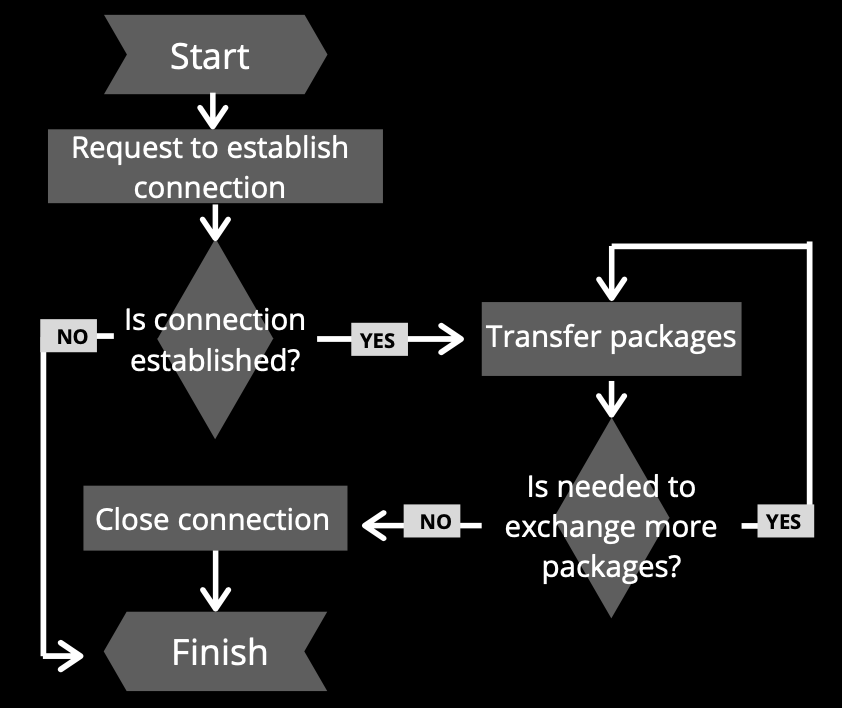
Establish the connection
Before starting to exchange data is needed to establish the connection, it is known as an “initial handshake”. It consists of sending a regular HTTP connection with an “upgrade” header from the client to the server, which indicates the solicitude to change the protocol used. The server received it and in case it supports the WebSocket protocol, it agrees to the upgrade and communicates this through a header response.
After that, the handshake is done and the initial HTTP connection is replaced by a WebSocket connection that uses the same initial TCP/IP connection.
Use of the connection
At this time both sides are allowed to send and receive data by the WebSocket protocol. Packages can be exchanged bidirectionally anytime and are in this phase when more of the events and methods that the WebSocket API brings can be used in a practical way.
Close connection
In order to make smart use of resources, it is important to close the connection whenever it is not used anymore, for that, both sides have equal rights to close the connection, all it has to do is to send the request using the “close” method with two optional params who indicate, respectively, the closing code and the reason of the action.
WebSocket API
This protocol offers a simple but useful interface to interact with it. There are a total of two methods and four events.
- Send (method): send data
- Close (method): close the connection
- Open (event): connection established. Available via the onopen property.
- Message (event): data received. Available via the onmessage property.
- Error (event): WebSocket error. Available via the onerror property.
- Close (event): connection closed. Available via the onclose property.
Then, the API offers other attributes such as binaryType, readyState, or bufferedAmount that allow us to make custom logic implementations as for example a rate limit to prevent DoS attacks to the server. Also, there are many WebSocket libraries that facilitate this and other high-level mechanisms.
Encrypted WebSocket
Using the ws URL schema it is possible to establish a WebSocket connection.
let socket = new WebSocket("ws://nodesource.com");
But it is also possible using the ‘wss’ URL schema too.
let socket = new WebSocket("wss://nodesource.com");
The main difference between them is that there is an ‘s’ of more in the second URL schema but that change has more implications than just the addition of a letter. That “s” stands for “secure” which means that this connection is encrypted using WebSocket over SSL/TLS.
As an analogy, WSS is to WS the same as HTTPS is to HTTP because HTTPS is an encrypted version of HTTP. For security reasons, it is highly recommended to use the encrypted way in both protocols.
Scalability
Scalability is a crucial consideration to have in mind in the design process of an application because otherwise, we can face non-beneficent scenarios when the moment of growth comes.
In order to increase the capacity and functionalities of the app when it requires there are two approaches to apply: vertical scalability and horizontal scalability.
Vertical scalability consists of adding more resources to the server, as for example more RAM, better CPU, or so on. It is a fast way to grow but it has limitations because we can’t do that infinitely.
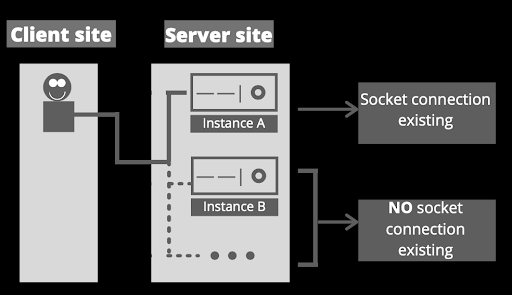
Horizontal scalability is about adding more instances of the server. It will require more configuration but it is a solution that can be implemented the number of times required. However, regarding the main characteristic of the WebSocket, which is the persistent bidirectional connection, we have that it is generated an important situation when we try to scale horizontally.
This happens because when the socket connection is established, it is bound to specific instances of a client and a server, and if we increase the number of instances in the backend, there is a possibility that the client requests a server's instance that has no idea about that connection established.
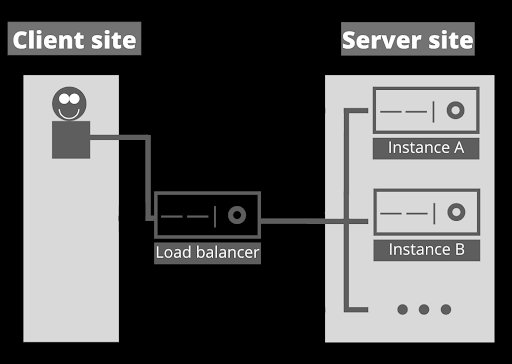
Anyway, there are alternatives to implement in order to avoid the situation explained, as for example, the implementation of a load balancer configured with a sticky-session. This way, those implementations will allow the client to request the correct server’s instance.
Conclusions
Node.js
Node.js is a relevant tool to develop real-time applications because, among others, it has the particularity to execute each instruction according to its characteristics and needs. It means that it can either execute tasks really fast on the call stack using synchronous code or delegate to someone else when it requires more processing power through the use of asynchronous code. This combination makes smart use of the resources and keeps in good shape the performance of the application.
We could get confused with some characteristics that at the beginning don't seem to be from a proficient tool for the development of real-time applications, such as the fact that JavaScript is a blocking language or that Node.js is single-threaded. But when we see the whole picture, we find other characteristics (for example, the asynchronous code and the event loop) that allow us to understand how Node.js works and how it takes advantage of its strengths and weaknesses.
It's important to understand too that because of all those characteristics we already mentioned before, Node.js is an excellent option not only for real-time applications but for applications that need to handle multiple I/O requests in general. Same way, it does not represent the best approach if it is required to deal with intensive CPU computing.
WebSocket
WebSocket is a protocol that establishes persistent bidirectional communication between parties. It provides a mechanism for browser-based applications that need two-way communication with servers that do not rely on opening multiple HTTP connections, which makes it a very useful tool in the development of real-time applications.
It presents an API that simplifies the interaction with the protocol but it does not include some common high-level mechanisms such as reconnection, authentication, or many others. However, it is possible to implement them manually or through a library. Also, the protocol offers an encrypted option for the exchange of packages and it is composed of a three-phase life cycle connection.
On other hand, it's important to have in mind that the horizontal scalability of an app with WebSockets will require extra steps, including adding more pieces to the architecture of the app and implementing configurations. Those extra steps are important to have in consideration in the design process of the app because, otherwise, it could represent non-beneficent scenarios in the future.
Finally, regarding my use case, the rehabilitation game consists of taking human movement and control in this way by running dinosaur game from Chrome. In that context, the WebSocket’s open connection allows exchanging, between the backend and frontend, the movements translated in data without the necessity to open a new HTTPS connection each time a movement is detected. About Node.js, its characteristics help the fast processing of the instructions which allows the real-time communication.
Read More
This blog post was first published in thedreaming.org blog.
I’m working on a reporting engine right now, and one of the requirements I have is to be able to export reports as PDF files, and send PDF reports via email. We also have a management page where you can see all the dashboards, and we’d like to render a PNG thumbnail of the dashboard to show here. Our back-end is all Node.js based, and you’re probably aware that Node is not known for it’s graphics prowess. All of our reports are currently being generated by a React app, written with Gatsby.js, so what we’d like to do is load up a report in a headless browser of some sort, and then either “print” that to PDF or take a PNG image. We’re going to look at doing exactly this using Playwright and Browserless.
The basic idea here is we want an API endpoint we can call into as an authenticated user, and get it to render a PDF of a web page for us. To do this we’re going to use two tools. The first is playwright, which is a library from Microsoft for controlling a headless Chrome or Firefox browser. The second is browserless, a microservice which hosts one or more headless Chrome browsers for us.
If you have a very simple use case, you might actually be able to do this entirely with browserless with their APIs. There’s a /pdf REST API which would do pretty much what we want here. We can pass in cookies and custom headers to authenticate our user to the reporting backend, we can set the width of the viewport to something reasonable (since of course our analytics page is responsive, and we want the desktop version in our PDF reports, not the mobile version).
But, playwright offers us two nice features that make it desirable here. First it has a much more expressive API. It’s easy, for example, to load a page, wait for a certain selector to be present (or not be present) to signal that the page is loaded, and then generate a PDF or screenshot. Second, when you npm install playwright, it will download a copy of Chrome and Firefox automatically, so when we’re running this locally in development mode we don’t even need the browserless container running.
Setting up and configuring playwright
In our backend analytics project, we’re going to start out by installing playwright:
$ npm install playwright
You’ll notice the first time you do this, it downloads a few hundred megs of browser binaries and stores them (on my mac) in ~/Library/Caches/ms-playwright. Later on, when we deploy our reporting microservice in a docker container, this is something we do not want to happen, because we don’t need a few hundred megs of browser binariers - that’s what browserless is for. So, in our backend project’s Dockerfile, we’ll modify our npm ci command:
RUN PLAYWRIGHT_SKIP_BROWSER_DOWNLOAD=1 npm ci && \
    rm -rf ~/.npm ~/.cache
If you’re not using docker, then however you run npm install in your backend, you want to add this PLAYWRIGHT_SKIP_BROWSER_DOWNLOAD environment variable to prevent all the browser binaries from being installed.
We do want playwright to use these browser binaries when it runs locally, but in production we want to use browserless. To control this, we’re going to set up an environment variable that controls playwright’s configuration:
// Set BROWSERLESS_URL environment variable to connect to browserless.
// e.g. BROWSERLESS_URL=wss://chrome.browserless.io?token=YOUR-API-TOKEN
const BROWSERLESS_URL = process.env.BROWSERLESS_URL;

let browser: pw.Browser | undefined;

export async function getBrowser() {
  if (!browser) {
    if (BROWSERLESS_URL) {
      // Connect to the browserless server.
      browser = await pw.chromium.connect({
        wsEndpoint: BROWSERLESS_URL,
      });
    } else {
      // In dev mode, just run a headless copy of Chrome locally/
      browser = await pw.chromium.launch({
        headless: false,
      });
    }

    // If the browser disconnects, create a new browser next time.
    browser.on("disconnected", () => {
      browser = undefined;
    });
  }

  return browser;
}
This creates a shared “browser” instance which we’ll use across multiple clients. Each client will create a “context”, which is sort of like an incognito window for that client. Contexts are cheap and lots can exist in parallel, whereas browser instances are expensive, so this lets us use a single instance of Chrome to serve many users.
We’re also going to write a little helper function here to make it easier to make sure we always release a browser context when we’re done with it:
async function withBrowserContext<T = void>(
  fn: (browserContext: pw.BrowserContext) => Promise<T>
) {
  const browser = await getBrowser();
  const browserContext = await browser.newContext();

  try {
    return await fn(browserContext);
  } finally {
    // Close the borwser context when we're done with
    // it. Otherwise browserify will keep it open forever.
    await browserContext.close();
  }
}
The idea here is you call this function, and pass in a function fn that accepts a browser context as a parameter. This lets us write code like:
await withBrowserContext((context) => {
  // Do stuff here!
});
And then we don’t have to worry about cleaning up the context if we throw an expection or otherwise exit our funciton in an “unexpected” way.
Generating the PDF or PNG
Now we get to the meaty part. We want an express endpoint which actually generates the PDF or the PNG. Here’s the code, with lots of comments. Obivously this is written with my “reporting” example in mind, so you’ll need to make a few small changes if you want to give this a try; notably you’ll probably want to change the express endpoint, and change the dashboardUrl to point to whatever page you want to make a PDF or PNG of.
// We set up an enviornment variable called REPORTING_BASE_URL
// which will point to our front end on localhost when running
// this locally, or to the real frontend in production.
const REPORTING_BASE_URL =
  process.env.REPORTING_BASE_URL || "http://localhost:8000";

// Helper function for getting numbers out of query parameters.
function toNumber(val: string | undefined, def: number) {
  const result = val ? parseInt(val, 10) : def;
  return isNaN(result) ? def : result;
}

// Our express endpoint
app.post("/api/reporting/export/:dashboardId", (req, res, next) => {
  Promise.resolve()
    .then(async () => {
      const type = -req.query.type || "pdf";
      const width = toNumber(req.query.width, 1200);
      const height = toNumber(req.query.height, 800);

      // Figure out what account and dashboard we want to show in the PDF.
      // Probably want to do some validation on these in a real system, although
      // since we're passing them as query parameters to another URL, there's
      // not much chance of an injection attack here...
      const qs = new URLSearchParams({ dashboardId: req.params.dashboardId });

      // If you're not building a reporting engine, change this
      // URL to whatever you want to make into a PDF/PNG. :)
      const dashboardUrl = `${REPORTING_BASE_URL}/dashboards/dashboard?${qs.toString()}`;

      await withBrowserContext(async (browserContext) => {
        // Set up authentication in the new browser context.
        await setupAuth(context.req, browserContext);

        // Create a new tab in Chrome.
        const page = await browserContext.newPage();
        await page.setViewportSize({ width, height });

        // Load our dashboard page.
        await page.goto(dashboardUrl);

        // Since this is a client-side app, we need to
        // wait for our dashboard to actually be visible.
        await page.waitForSelector("css=.dashboard-page");

        // And then wait until all the loading spinners are done spinning.
        await page.waitForFunction(
          '!document.querySelector(".loading-spinner")'
        );

        if (type === "pdf") {
          // Generate the PDF
          const pdfBuffer = await page.pdf();

          // Now that we have the PDF, we could email it to a user, or do whatever
          // we want with it. Here we'll just return it back to the client,
          // so the client can save it.
          res.setHeader(
            "content-disposition",
            'attachment; filename="report.pdf"'
          );
          res.setHeader("content-type", "application/pdf");
          res.send(pdfBuffer);
        } else {
          // Generate a PNG
          const image = await page.screenshot();
          res.setHeader("content-type", "image/png");
          res.send(image);
        }
      });
    })
    .catch((err) => next(err));
});
As the comments say, this creates a new “browser context” and uses the context to visit our page and take a snapshot.
Authentication
There’s one bit here I kind of glossed over:
// Set up authentication in the new browser context.
await setupAuth(context.req, browserContext);
Remember that browserless is really just a headless Chrome browser. The problem here is we need to authenticate our user twice; the user needs to authenticate to this backend express endpoint, but then this is going to launch a Chrome browser and navigate to a webpage, so we need to authenticate the user in that new browser session, too (since obviously not just any user off the Internet is allowed to look at our super secret reporting dashboards). We could visit a login page and log the user in, but it’s a lot faster to just set the headers and/or cookies we need to access the page.
What exactly this setupAuth() function does is going to depend on your use case. Maybe you’ll call browserContext.setExtraHTTPHeaders() to set a JWT token. In my case, my client is authenticating with a session cookie. Unfortunately we can’t use setExtraHTTPHeaders() to just set the session cookie, because Playwright generates it’s own cookie header and we can’t override it. So instead, I’ll parse the cookie that was sent to us and then forward it on to the browser context: via browserContext.addCookies().
import * as cookieParse from "cookie-parse";
import { URL } from "url";

// Playwright doesn't let us just set the "cookie"
// header directly. We need to actually create a
// cookie in the browser. In order to make sure
// the browser sends this cookie, we need to set
// the domain of the cookie to be the same as the
// domain of the page we are loading.
const REPORTING_DOMAIN = new URL(REPORTING_BASE_URL).hostname;

async function setupAuth(
  req: HttpIncomingMessage,
  browserContext: pw.BrowserContext
) {
  // Pass through the session cookie from the client.
  const cookie = req.headers.cookie;
  const cookies = cookie ? cookieParse.parse(cookie) : undefined;

  if (cookies && cookies["session"]) {
    console.log(`Adding session cookie: ${cookies["session"]}`);
    await browserContext.addCookies([
      {
        name: "session",
        value: cookies["session"],
        httpOnly: true,
        domain: REPORTING_DOMAIN,
        path: "/",
      },
    ]);
  }
}
We actually don’t have to worry about the case where the session cookie isn’t set - the client will just get a screenshot of whatever they would have gotten if they weren’t logged in!
If we log in to our UI, and then visit http://localhost:8000/api/reporting/export/1234, we should now see a screenshot of our beautiful reporting dashboard.
Cleaning up site headers
If you actually give this a try, you might notice that your PDF has all your menus and navigation in it. Fortunately, this is easy to fix with a little CSS. Playwright/browserless will render the PDF with the CSS media set to “print”, exactly as if you were trying to print this page from a browser. So all we need to do is set up some CSS to hide our site’s navigation for that media type:
@media print {
  .menu,
  .sidebar {
    display: none;
  }
}
An alternative here might be to pass in an extra query parameter like bare=true, although the CSS version is nice because then if someone tries to actually print our page from their browser, it’ll work.
Setting up Browserless
So far we’ve been letting Playwright launch a Chrome instance for us. This works fine when we’re debugging locally, but in production, we’re going to want to run that Chrome instance as a microservice in another container, and for that we’re going to use browserless. How you deploy browserless in your production system is outside the scope of this article, just because there’s so many different ways you could do it, but let’s use docker-compose to run a local copy of browserless, and get our example above to connect to it.
First, our docker-compose.yml file:
version: "3.6"
services:
  browserless:
    image: browserless/chrome:latest
    ports:
      - "3100:3000"
    environment:
      - MAX_CONCURRENT_SESSIONS=10
      - TOKEN=2cbc5771-38f2-4dcf-8774-50ad51a971b8
Now we can run docker-compose up -d to run a copy of browserless, and it will be available on port 3100, and set up a token so not just anyone can access it.
Now here I’m going to run into a little problem. The UI I want to take PDFs and screenshots from is a Gatsby app running on localhost:8000 on my Mac. The problem is, this port is not going to be visible from inside my docker VM. There’s a variety of ways around this problem, but here we’ll use ngrok to set up a publically accessible tunnel to localhost, which will be visible inside the docker container:
$ ngrok http 8000
Forwarding                    http://c3b3d3d435f1.ngrok.io -> localhost:8000
Forwarding                    https://c3b3d3d435f1.ngrok.io -> localhost:8000
Now we can run our reporting engine with:
$ BROWSERLESS_URL=ws://localhost:3100?token=2cbc5771-38f2-4dcf-8774-50ad51a971b8 \
    REPORTING_BASE_URL=https://c3b3d3d435f1.ngrok.io
    node ./dist/bin/server.js
And now if we try to hit up our endpoint, we should once again see a screenshot of our app!
Hopefully this was helpful! If you try this out, or have a similar (or better!) solution, please let us know!
Read More
tl;dr — This is the fifth article of the Node is Simple article series. In this article series, I will be discussing how to create a simple and secure NodeJS, Express, MongoDB web application.
To follow the past tutorials:
Hello, hello, my dear fellow developers, glad you could make it to my article where I discuss developing web applications with NodeJS. As I promised in the previous article, in this article I will tell you how to use custom middleware with Express.
So what is this Middleware?
That’s the question, isn’t it? As I told you many times, Express is great with middleware. As discussed in the Express documentation,
Middleware functions are functions that have access to the request object (
req), the response object (res), and the next middleware function in the application’s request-response cycle. The next middleware function is commonly denoted by a variable namednext.
Express is nothing without middleware. So I am going to implement a simple error handling middleware. As the Express documentation describes,
app.use(function (err, req, res, next) {
  console.error(err.stack)
  res.status(500).send('Something broke!')
})
this is how we create a simple middleware to log errors. But in this tutorial, I will extend this middleware to return specific error messages and HTTP error codes in the response and log the error messages in the console.
So let’s get to it, shall we?
First, let’s create some error classes to represent errors that we are going to get from the web application.
Let’s create /errors/index.js file.
module.exports = {
  AccessDeniedError: class AccessDeniedError {
    constructor(message) {
      this.message = message;
    }
  },
  AuthenticationError: class AuthenticationError {
    constructor(message) {
      this.message = message;
    }
  },
  ValidationError: class ValidationError {
    constructor(message) {
      this.message = message;
    }
  },
  NotFoundError: class NotFoundError {
    constructor(message) {
      this.message = message;
    }
  }
};
Let’s see what’s happening here. Here, we are declaring four classes to describe errors we encounter in web applications.
- Access Denied Error (HTTP 403)
- Authentication Error (HTTP 401)
- Not Found Error (HTTP 404)
- Validation Error (HTTP 400)
Of course, there is another famous HTTP error which is called Internal Server Error (HTTP 500) but since it is a very generic error, we are not declaring a specific class to describe that and it will be the default error.
Then let’s create the error handling middleware. Let’s create /middleware/error-handling.js file.
const {
  ValidationError,
  AuthenticationError,
  AccessDeniedError,
  NotFoundError
} = require("../errors");
const chalk = require("chalk");

const errorLogger = (err, req, res, next) => {
  if (err.message) {
    console.log(chalk.red(err.message));
  }
  if (err.stack) {
    console.log(chalk.red(err.message));
  }
  next(err);
};

const authenticationErrorHandler = (err, req, res, next) => {
  if (err instanceof AuthenticationError)
    return res.status(401).send({ message: err.message });
  next(err);
};

const validationErrorHandler = (err, req, res, next) => {
  if (err instanceof ValidationError)
    return res.status(400).send({ message: err.message });
  next(err);
};

const accessDeniedErrorHandler = (err, req, res, next) => {
  if (err instanceof AccessDeniedError)
    return res.status(403).send({ message: err.message });
  next(err);
};

const notFoundErrorHandler = (err, req, res, next) => {
  if (err instanceof NotFoundError)
    return res.status(404).send({ message: err.message });
  next(err);
};

const genericErrorHandler = (err, req, res, next) => {
  res.status(500).send({ message: err.message });
  next();
};

const ErrorHandlingMiddleware = app => {
  app.use([
    errorLogger,
    authenticationErrorHandler,
    validationErrorHandler,
    accessDeniedErrorHandler,
    notFoundErrorHandler,
    genericErrorHandler
  ]);
};

module.exports = ErrorHandlingMiddleware;

Well, the code is somewhat complicated, isn’t it? Fear not, I will discuss what is happening here. First, we need to know how the Express middleware work. In Express middleware, if you provide error first callback, it will create the signature as an error-handling middleware.
Error-handling middleware always takes four arguments. You must provide four arguments to identify it as an error-handling middleware function. Even if you don’t need to use the
nextobject, you must specify it to maintain the signature. Otherwise, thenextobject will be interpreted as regular middleware and will fail to handle errors.
(from https://expressjs.com/en/guide/using-middleware.html)
And another thing to mention is that the middleware can be defined as arrays. The array order will be preserved and the middleware will be applied in that order. So according to our code,
1. errorLogger //Logging errors
2. authenticationErrorHandler //return authentication error
3. validationErrorHandler //return validation error
4. accessDeniedErrorHandler //return access denied error
5. notFoundErrorHandler //return not found error
6. genericErrorHandler //return internal server error
this middleware will be called in the particular order. In our web application, if there is an error thrown, first the error will be logged in the console and the error will be passed to the authenticationErrorHandler with the next(err) handler. If the error is an instance of AuthenticationError class, then it will end the request-response cycle by returning the relevant error. If not it will be passed on to the next error handling middleware. So as you can imagine it will be passed to down in the middleware stack and finally it will be passed to the genericErrorHandler middleware and the request-response cycle will be ended. And it is simple as that.
Now let’s bind this middleware as an application-level middleware. Let’s update /index.js file.
const express = require("express");
const chalk = require("chalk");
const http = require("http");
const https = require("https");
const config = require("./config");

const HTTP_PORT = config.HTTP_PORT;
const HTTPS_PORT = config.HTTPS_PORT;
const SERVER_CERT = config.SERVER_CERT;
const SERVER_KEY = config.SERVER_KEY;

const app = express();
const Middleware = require("./middleware");
const ErrorHandlingMiddleware = require("./middleware/error-handling");
const MainController = require("./controllers");

Middleware(app);
app.use("", MainController);
ErrorHandlingMiddleware(app);
app.set("port", HTTPS_PORT);

/**
 * Create HTTPS Server
 */

const server = https.createServer(
  {
    key: SERVER_KEY,
    cert: SERVER_CERT
  },
  app
);

const onError = error => {
  if (error.syscall !== "listen") {
    throw error;
  }

  const bind =
    typeof HTTPS_PORT === "string"
      ? "Pipe " + HTTPS_PORT
      : "Port " + HTTPS_PORT;

  switch (error.code) {
    case "EACCES":
      console.error(chalk.red(`[-] ${bind} requires elevated privileges`));
      process.exit(1);
      break;
    case "EADDRINUSE":
      console.error(chalk.red(`[-] ${bind} is already in use`));
      process.exit(1);
      break;
    default:
      throw error;
  }
};

const onListening = () => {
  const addr = server.address();
  const bind = typeof addr === "string" ? `pipe ${addr}` : `port ${addr.port}`;
  console.log(chalk.yellow(`[!] Listening on HTTPS ${bind}`));
};

server.listen(HTTPS_PORT);
server.on("error", onError);
server.on("listening", onListening);

/**
 * Create HTTP Server (HTTP requests will be 301 redirected to HTTPS)
 */
http
  .createServer((req, res) => {
    res.writeHead(301, {
      Location:
        "https://" +
        req.headers["host"].replace(
          HTTP_PORT.toString(),
          HTTPS_PORT.toString()
        ) +
        req.url
    });
    res.end();
  })
  .listen(HTTP_PORT)
  .on("error", onError)
  .on("listening", () =>
    console.log(chalk.yellow(`[!] Listening on HTTP port ${HTTP_PORT}`))
  );

module.exports = app;
Now I have something to clarify. As you can see line 19, I have added the ErrorHandlingMiddleware(app) there. You might wonder is there a specific reason behind that. Actually there is.
Middleware(app);
app.use("", MainController);
ErrorHandlingMiddleware(app);
app.set("port", HTTPS\_PORT);
As you can remember, the Express treats the middleware in their order we are binding it with the app. So if we bind the error handling middleware before binding the Express router, the Express app would not know where are the errors are being thrown. So we first bind the Express router and then we bind the error handling middleware.
Now if you start the web application as usual,
$ pm2 start
and do some CRUD, operation, you won’t see any errors return since we haven’t added any error handling in our /services/index.js file. So I will show you an example of an error by explicitly throwing an error.
Let’s add this error endpoint. Every time you hit it, it will throw you a not found error. Let’s update /controllers/index.js file.
GET /error
_const_ { NotFoundError } = require("../errors");_/\*\*_ **_@route_** _GET /error
 \*_ **_@desc_** _Return an example error
 \*_ **_@access_** _Public
 \*/
_router.get(
  "/error",
  asyncWrapper(_async_ () => {
    _throw new_ NotFoundError("Sorry content not found");
  })
);

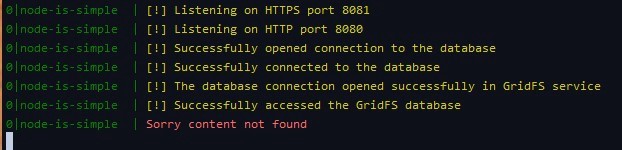
As you can see in figure 1, the response status is 404 and the message says “Sorry content not found”. So it works as it should.
Now let’s see how our console looks. Now type,
$ pm2 logs
in your terminal and see the console log.
Bonus super-secret round
So I’m going to tell you a super-secret about how to view colored logs in PM2. You just have to add a single line to the /ecosystem.config.js file.
const fs = require("fs");

const SERVER_CERT = fs.readFileSync(__dirname + "/config/server.cert", "utf8");
const SERVER_KEY = fs.readFileSync(__dirname + "/config/server.key", "utf8");

module.exports = {
  apps: [
    {
      name: "node-is-simple",
      script: "./index.js",
      watch: true,
      args: ["--color"],
      env: {
        NODE_ENV: "development",
        SERVER_CERT,
        SERVER_KEY,
        HTTP_PORT: 8080,
        HTTPS_PORT: 8081,
        MONGO_URI: "mongodb://localhost/students"
      }
    }
  ]
};
ecosystem.config.js file (Reflects the update to view colored console output)
All you have to do is add line 12. args: ["--color"],
Bonus Bonus round
Now I’m going to tell you about two additional Express middleware libraries which are going to save your life 🤣.
- Morgan (HTTP request logger middleware for node.js)
- CORS (CORS is a node.js package for providing a Connect/Express middleware that can be used to enable CORS with various options.)
I guarantee that these two libraries will save you from certain pitfalls and you’ll thank them pretty much all the time.
This is a good article on Morgan.
Getting Started With morgan: the Node.js Logger Middleware
This is a good article on CORS.
So let’s update our /middleware/common.js file.
const bodyParser = require("body-parser");
const helmet = require("helmet");
const morgan = require("morgan");
const cors = require("cors");

module.exports = app => {
  app.use(bodyParser.json());
  app.use(morgan("dev"));
  app.use(cors());
  app.use(helmet());
};
Then let’s install these two packages.
$ npm install cors morgan
Let’s see how the Morgan would show the HTTP requests in our console. We have specified “dev” as the logging level for Morgan. You can find more details on that from the documentation.

GET / 200 3.710 ms - 39
Let’s understand what this means.
:method :url :status :response-time ms - :res\[content-length\]
This is what the documentation says. Let’s break it down.
:method = GET (The HTTP method of the request.):url = / (The URL of the request. This will use req.originalUrl if exists, otherwise req.url.):status = 200 (The status code of the response.):response-time = 3.710 (The time between the request coming into morgan and when the response headers are written, in milliseconds.):res\[content-length\] = 39 (content-length of the response. If the content-length is not present, the value will be displayed as "-" in the log.)
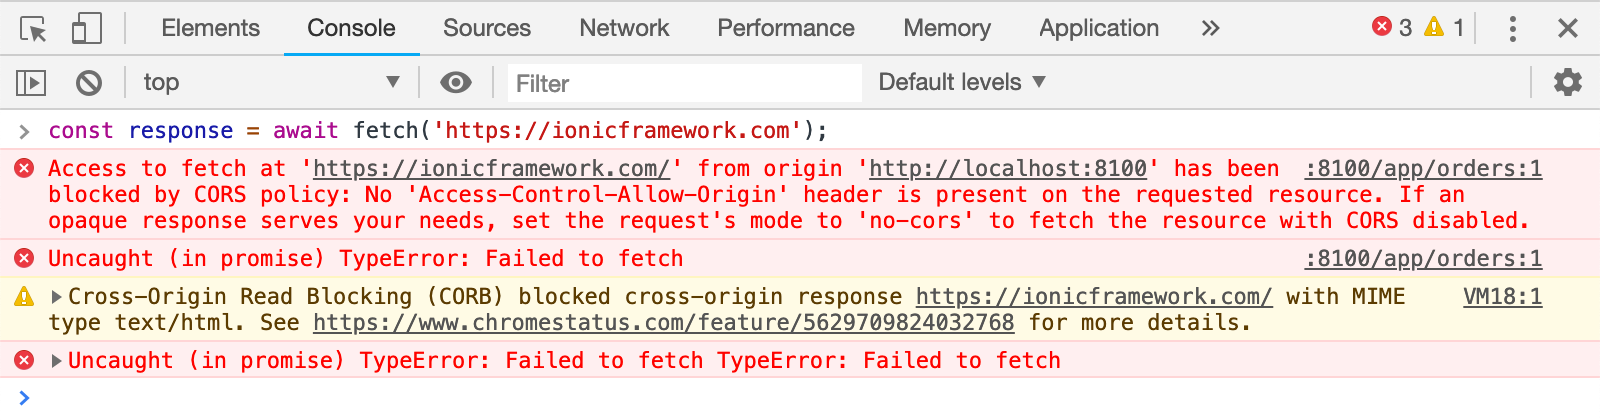
This is it. Now if we move on to what the CORS module does, it ain’t much but it’s honest work 😁. It will save you from Cross-Origin Resource Sharing issues. If you have worked with APIs and front-ends, the CORS error is something you’ve seen at least once in your lifetime.
So CORS module will allow you to add CORS header with ease. I know this article was a little bit longer because I had to share some super-secrets with you. So this is it for this article and I will tell you how to secure our endpoints with JWT authentication in the next article. As usual, you can find the updated code in the GitHub repository. (Look for the commit message “Tutorial 5 checkpoint”.)
So until we meet again, happy coding.
Read More
tl;dr — This is the fourth article of the Node is Simple article series. In this article series, I will be discussing how to create a simple and secure NodeJS, Express, MongoDB web application.
To follow the past tutorials, Node is Simple Part 1, Node is Simple Part 2 and Node is Simple Part 3.
Hello fellow developers, now you’ve come across this article series, let’s get to it, shall we. In the past articles, I have discussed how to create simple CRUD endpoints, with MongoDB as the database and how to use Postman to test the endpoints. So in this tutorial, I will discuss how to upload files to MongoDB using MongoDB GridFS and view (or stream) them.
So what is this GridFS?
We can upload files to a folder easily with Multer-Middleware. This is a good reference for that.
Uploading Files and Serve Directory Listing Using NodeJS
But I am going to discuss how to use MongoDB as the file storage. However, there is a little hiccup, where you can only store 16MB as a document in MongoDB BSON format. To overcome this issue, there is a feature called GridFS.
Instead of storing a file in a single document, GridFS divides the file into parts, or chunks [1], and stores each chunk as a separate document.
Enough with the theory
Yes, let’s move on to implementation. First, we have to create a GridFS driver. Let’s create gridfs-service.js file inside /database directory.
const mongoose = require("mongoose");
const config = require("../config");
const dbPath = config.MONGO_URI;
const chalk = require("chalk");

const GridFsStorage = require("multer-gridfs-storage");
const Grid = require("gridfs-stream");
Grid.mongo = mongoose.mongo;

const conn = mongoose.createConnection(dbPath, {
  useNewUrlParser: true,
  useUnifiedTopology: true,
  useCreateIndex: true,
  useFindAndModify: false
});

conn.on("error", () => {
  console.log(chalk.red("[-] Error occurred from the database"));
});

let gfs, gridFSBucket;

conn.once("open", () => {
  gridFSBucket = new mongoose.mongo.GridFSBucket(conn.db, {
    bucketName: "file_uploads"
  });
  // Init stream
  gfs = Grid(conn.db);
  gfs.collection("file_uploads");
  console.log(
    chalk.yellow(
      "[!] The database connection opened successfully in GridFS service"
    )
  );
});

const getGridFSFiles = id => {
  return new Promise((resolve, reject) => {
    gfs.files.findOne({ _id: mongoose.Types.ObjectId(id) }, (err, files) => {
      if (err) reject(err);
      // Check if files
      if (!files || files.length === 0) {
        resolve(null);
      } else {
        resolve(files);
      }
    });
  });
};

const createGridFSReadStream = id => {
  return gridFSBucket.openDownloadStream(mongoose.Types.ObjectId(id));
};

const storage = new GridFsStorage({
  url: dbPath,
  cache: true,
  options: { useUnifiedTopology: true },
  file: (req, file) => {
    return new Promise(resolve => {
      const fileInfo = {
        filename: file.originalname,
        bucketName: "file_uploads"
      };
      resolve(fileInfo);
    });
  }
});

storage.on("connection", () => {
  console.log(chalk.yellow("[!] Successfully accessed the GridFS database"));
});

storage.on("connectionFailed", err => {
  console.log(chalk.red(err.message));
});

module.exports = mongoose;
module.exports.storage = storage;
module.exports.getGridFSFiles = getGridFSFiles;
module.exports.createGridFSReadStream = createGridFSReadStream;
If you can see line 63, the “bucketName” is set to “file_uploads”. This means the collection that we are using for storing the files is named as file_uploads. After running the application if you go to the MongoDB Compass, you can see there are two new collections are created.
file_uploads.chunks //contains the file chunks (one file is divided in to chunks of 255 kiloBytes.

file_uploads.files //contains the metadata of the file (such as lenght, chunkSize, uploadDate, filename, md5 hash, and the contentType)
Now we need to install several packages for this. Let’s install them.
$ npm install multer multer-gridfs-storage gridfs-stream
Multer is the middleware that handles multipart/form-data. This is a good reference if you are not familiar with them.
Understanding HTML Form Encoding: URL Encoded and Multipart Forms
The other two packages are for the file upload handling with MongoDB GridFS.
After creating this file, let’s create the GridFS middleware. It is really easy to integrate with Express since Express is handy with middleware. Let’s create /middleware/gridfs-middleware.js file.
const multer = require("multer");
const { storage } = require("../database/gridfs-service");

const upload = multer({
  storage
});

module.exports = function GridFSMiddleware() {
  return upload.single("image");
};
There is something to mention here. If you can see line 9, I set “image” as the name of the form field name. You can set it to anything you like, but you have to remember it for later use. FYI, There are several methods of uploading files.
upload.single("field_name"); //for uploading a single file

upload.array("field_name"); //for uploading an array of files

upload.fields([{name: 'avatar'}, {name: 'gallery'}]); //for uploading an array of files with multiple field names

upload.none(); //not uploading any files but contains text fields as multipart form data
Here I used, upload.single(“field_name”) because I want to upload only one image (Probably I’ll change this to uploading the student’s profile picture). However, the things I’ve described in the above code-block are not something I brew up myself 🤣. They are all described beautifully in the multer documentation.
Now we can set up the controller to upload files to MongoDB GridFS. Let’s update the /controllers/index.js file.
const GridFSMiddleware = require("../middleware/gridfs-middleware");
/** @route  POST /image
 *  @desc   Upload profile image
 *  @access Public
 */
router.post(
  "/image",
  [GridFSMiddleware()],
  asyncWrapper(async (req, res) => {
    const { originalname, mimetype, id, size } = req.file;
    res.send({ originalname, mimetype, id, size });
  })
);
Now let’s try to upload an image, shall we? Let’s start the web application as usual.
$ pm2 start

As in figure 1, you have to select the request body as form-data and then you have to set the key as image. Now select the key type as “File”. (As seen in Figure 2)


Now if you see the response as figure 3, it means everything worked out. Now let’s see how the MongoDB Compass shows the uploaded file.


As you can see in figure 4, the file metadata is shown. In figure 5, you can see only one chunk. That is because the image we uploaded is less than 255kB in size.
Now that we have uploaded the file, how do we view it? We cannot see the image from the DB, now can we? So let’s implement a way to view the uploaded image.
Now let’s update the /controllers/index.js file.
const { getGridFSFiles } = require("../database/gridfs-service");
const { createGridFSReadStream } = require("../database/gridfs-service");
/** @route   GET /image/:id
 *  @desc    View profile picture
 *  @access  Public
 */
router.get(
  "/image/:id",
  asyncWrapper(async (req, res) => {
    const image = await getGridFSFiles(req.params.id);
    if (!image) {
      res.status(404).send({ message: "Image not found" });
    }
    res.setHeader("content-type", image.contentType);
    const readStream = createGridFSReadStream(req.params.id);
    readStream.pipe(res);
  })
);
What we are doing here is, we get the image id from the request and check for the image in the DB and if the image exists, we stream it. If the image is not found we return a 404 and a not found message. It is as simple as that.
Now let’s try that out.

Remember the image id is what gets returned as the id in figure 3.

If we send the GET request from a web browser, we’ll see the image in the browser. (If you get a “Your connection is not private” message, ignore it.) It will be the same as in figure 7.
So that was a lot of work, isn’t it? But totally worth it. Now you can save your precious images inside a MongoDB database and view them from a browser. Go show off that talent to your friends and impress them 😁.
This is the full /controllers/index.js file for your reference.
/controllers/index.js file (Updated to reflect the view and upload image endpoints)
So, this is the end for this tutorial and in the next tutorial, I will tell you how to create and use custom middleware with Express. (Remember I told you Express is great with middleware). As usual, you can see the whole code behind this tutorial in my GitHub repository. (Check for the commit message “Tutorial 4 checkpoint”.)
So until we meet again, happy coding…
Read More
tl;dr — This is the third article of the Node is Simple article series. In this article series, I will be discussing how to create a simple and secure NodeJS, Express, MongoDB web application.
To follow the past tutorials, Node is Simple Part 1, and Node is Simple Part 2.
Hello, fellow developers, I am once again, asking you to learn some NodeJS with me. In this tutorial, I will be discussing creating basic CRUD operations in NodeJS. So without further ado, let’s start, shall we?
CREATE endpoint
If you can remember in my previous article, I have created a simple endpoint to POST a name and city of a student and created a record (document) of the student. What I am going to do is enhance what I’ve already done. Let’s update the model, and the service to reflect our needs.
We are going to add some new fields to the student document.
const mongoose = require("../database");
const Schema = mongoose.Schema;

const studentSchema = new Schema(
  {
    _id: {
      type: mongoose.SchemaTypes.String,
      unique: true,
      required: true,
      index: true
    },
    name: { type: mongoose.SchemaTypes.String, required: true },
    city: { type: mongoose.SchemaTypes.String, required: true },
    telephone: { type: mongoose.SchemaTypes.Number, required: true },
    birthday: { type: mongoose.SchemaTypes.Date, required: true }
  },
  { strict: true, timestamps: true, _id: false }
);

const collectionName = "student";

const Student = mongoose.model(collectionName, studentSchema, collectionName);

module.exports = {
  Student
};
What I’ve done here is added \id, telephone,_ and birthday as the new fields. And I have disabled the Mongoose default \id_ and specified my own.
Now let’s update the service file.
const { Student } = require("../models");

module.exports = class StudentService {
  async registerStudent(data) {
    const { _id, name, city, telephone, birthday } = data;

    const new_student = new Student({
      _id,
      name,
      city,
      telephone,
      birthday
    });

    const response = await new_student.save();
    const res = response.toJSON();
    delete res.__v;
    return res;
  }
};
Before we are going to test what we have done, I am going to let you in on a super-secret. If you have experience in developing NodeJS applications, I hope you have come across the Nodemon tool. It restarts the server once you changed the files. But today I am going to tell you about this amazing tool called PM2.
What is PM2?
PM2 is a production-grade process management tool. It has various capabilities such as load balancing (which I will discuss in a later tutorial), enhanced logging features, adding environment variables, and many more. Their documentation is super nifty and worth checking out.
So let’s install PM2 and start using it in our web app.
$ npm install pm2@latest -g
Let’s create ecosystem.config.js file in the project root, which will contain all of our environment variables, keys, secrets, and PM2 configurations.
const fs = require("fs");

const SERVER_CERT = fs.readFileSync(__dirname + "/config/server.cert", "utf8");
const SERVER_KEY = fs.readFileSync(__dirname + "/config/server.key", "utf8");

module.exports = {
  apps: [
    {
      name: "node-is-simple",
      script: "./index.js",
      watch: true,
      env: {
        NODE_ENV: "development",
        SERVER_CERT,
        SERVER_KEY,
        HTTP_PORT: 8080,
        HTTPS_PORT: 8081,
        MONGO_URI: "mongodb://localhost/students"
      }
    }
  ]
};
Since we have moved all of our keys as the environment variables, now we have to change /config/index.js file to reflect these changes.
module.exports = {
  SERVER_CERT: process.env.SERVER_CERT,
  SERVER_KEY: process.env.SERVER_KEY,
  HTTP_PORT: process.env.HTTP_PORT,
  HTTPS_PORT: process.env.HTTPS_PORT,
  MONGO_URI: process.env.MONGO_URI
};
Now, remember, /config/index.js is safe to commit to a public repository. But not the ecosystem.config.js file. Also never commit your private keys to a public repository (But I’ve done it for the demonstration purposes). Protect your secrets like your cash 😂.
Since we have done our initial setup let’s run our application. And one thing to keep in mind. If you start the application, as usual,
$ node index.js
it won’t work. Now we have to use PM2 to start our application because it contains all the environment variables needed for the Node web application. Now go to the project root folder and run the following command.
$ pm2 start

If you see this (figure 1) in your console it is working as it should. Now to see the logs run the following command.
$ pm2 logs

If you see this (figure 2) in your console then the node app is working as it should.
Enough with the PM2
Yes, let’s move to test our enhanced CREATE endpoint.
Now create a request like this (figure 3) and hit Send.
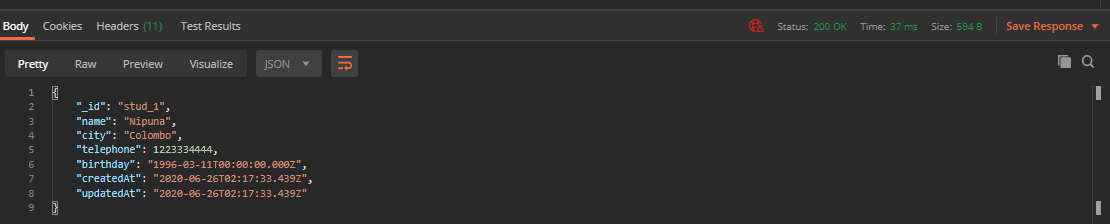
If you see this response (figure 4), it is safe to say everything works as it should. Yay!
Now since we have a CREATE endpoint, let’s add a READ endpoint.
READ endpoint
Now let’s read what’s inside our student collection. We can view all the students who are registered, or we can see details from only one student.
GET /students
Now let’s get all the students’ details. We only get the \id, name,_ and city of the student here. Add these lines to the /controllers/index.js file.
/** @route  GET /students
 *  @desc   Get all students
 *  @access Public
 */
router.get(
  "/students",
  asyncWrapper(async (req, res) => {
    const response = await studentService.getAllStudents();
    res.send(response);
  })
);
And add these lines (inside the StudentService class) to the /servcies/index.js file.
_async_ getAllStudents() {
  _return_ Student.find({}, "\_id name city");
}
Let me give a summary of the above lines. Student.find() is the method to apply queries to the MongoDB. Since we need all the students we pass the empty object as the first argument. As the second argument (which is called a projection) we provide the fields we want to return and the fields we do not want to return. Here I want \id, name,_ and city. We can use “-field\name”_ to provide the field we do not want.
GET /students/:id
Now let’s get all the details from a single student. Now here we are getting all the details of a single student.
Now add these lines to the /controllers/index.js file.
/** @route  GET /students/:id
 *  @desc   Get a single student
 *  @access Public
 */
router.get(
  "/students/:id",
  asyncWrapper(async (req, res) => {
    const response = await studentService.getStudent(req.params.id);
    res.send(response);
  })
);
In the Express router, we can specify a path parameter via /:param syntax. Now we can access this path parameter via req.params.param. This is basic Express and to get more knowledge on this please refer to the documentation, and it is a great source of good knowledge.
Now add these lines to the /servcies/index.js file.
_async_ getStudent(\_id) {
  _return_ Student.findById(\_id, "-\_\_v -createdAt -updatedAt");
}
Here we provide the \id_ of the student to get the details. As the projection, we do not want \_v, createdAt,_ and updatedAt fields.
Now let’s check these endpoints.

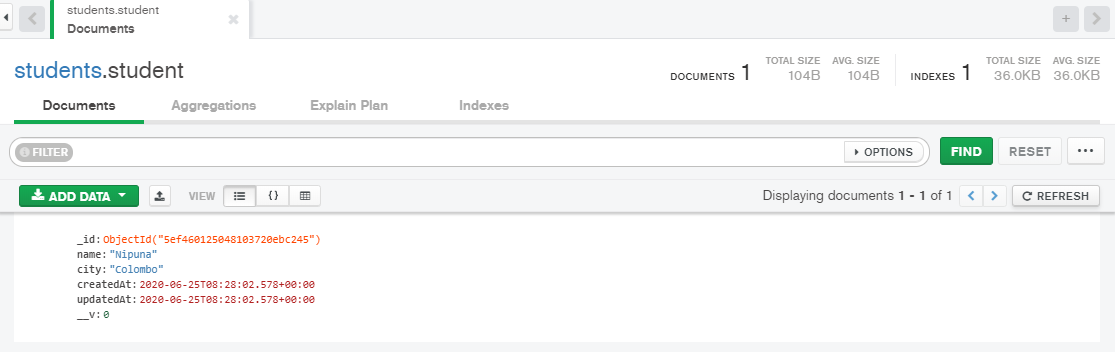
I have added two more students’ details, so I got three records.
Now let’s check the single student endpoint.


If you get similar results in figure 6 and figure 8 let’s say it was a success.
Update endpoint
Since we created student records, viewed these student records, now it is time to update these student records.
To PUT, or to PATCH?
So this is the biggest question, to update a resource, should we use PUT or PATCH? The answer is somewhat simple. If you want to update the whole resource every time, use PUT. If you want to update the resource partially, use PATCH. It is that simple. This article clarified this dilemma.
Differences between PUT and PATCH
Since I am going to partially update the student record, I will be using PATCH.
PATCH /students/:id
Now let’s update the /controllers/index.js file.
/** @route  PATCH /students/:id
 *  @desc   Update a single student
 *  @access Public
 */
router.patch(
  "/students/:id",
  asyncWrapper(async (req, res) => {
    const response = await studentService.updateStudent(
      req.params.id,
      req.body
    );
    res.send(response);
  })
);
After adding this let’s update the /services/index.js file.
_async_ updateStudent(\_id, { name, city, telephone, birthday }) {
  _return_ Student.findOneAndUpdate(
    { \_id },
    {
      name,
      city,
      telephone,
      birthday
    },
    {
      _new_: _true_,
      omitUndefined: _true_,
      fields: "-\_\_v -createdAt -updatedAt"
    }
  );
}
Let me give a brief description of what’s going on here. We update the student by the given id, and we provide the name, city, telephone, and birthday data to be updated. As the third argument we provide new: true to return the updated document to us, omitUndefined: true to partially update the resource and fields: “-\_v -createdAt -updatedAt”_ to remove these fields from the returning document.
Now let’s check this out.


So if you get similar results as figure 10 then let’s say yay! Now let’s move on to the final part of this tutorial, which is DELETE.
DELETE endpoint
Since we create, read, and update, now it is time to delete some students 😁.
DELETE /students/:id
Since we should not delete all the students at once (It is a best practice IMO), let’s delete student by the provided student_id.
Now let’s update the /controllers/index.js file.
/** @route  DELETE /students/:id
 *  @desc   Delete a single student
 *  @access Public
 */
router.delete(
  "/students/:id",
  asyncWrapper(async (req, res) => {
    const response = await studentService.deleteStudent(req.params.id);
    res.send(response);
  })
);
Now let’s update the /services/index.js file.
_async_ deleteStudent(\_id) {
  _await_ Student.deleteOne({ \_id });
  _return_ { message: \`Student \[${\_id}\] deleted successfully\` };
}
Now the time to see this in action.


If the results are similar to figure 12, then it is safe to assume, the application works as it should.
So here are the current /controllers/index.js file and /services/index.js file for your reference.
const router = require("express").Router();
const asyncWrapper = require("../utilities/async-wrapper");
const StudentService = require("../services");
const studentService = new StudentService();

/** @route  GET /
 *  @desc   Root endpoint
 *  @access Public
 */
router.get(
  "/",
  asyncWrapper(async (req, res) => {
    res.send({
      message: "Hello World!",
      status: 200
    });
  })
);

/** @route  POST /register
 *  @desc   Register a student
 *  @access Public
 */
router.post(
  "/register",
  asyncWrapper(async (req, res) => {
    const response = await studentService.registerStudent(req.body);
    res.send(response);
  })
);

/** @route  GET /students
 *  @desc   Get all students
 *  @access Public
 */
router.get(
  "/students",
  asyncWrapper(async (req, res) => {
    const response = await studentService.getAllStudents();
    res.send(response);
  })
);

/** @route  GET /students/:id
 *  @desc   Get a single student
 *  @access Public
 */
router.get(
  "/students/:id",
  asyncWrapper(async (req, res) => {
    const response = await studentService.getStudent(req.params.id);
    res.send(response);
  })
);

/** @route  PATCH /students/:id
 *  @desc   Update a single student
 *  @access Public
 */
router.patch(
  "/students/:id",
  asyncWrapper(async (req, res) => {
    const response = await studentService.updateStudent(
      req.params.id,
      req.body
    );
    res.send(response);
  })
);

/** @route  DELETE /students/:id
 *  @desc   Delete a single student
 *  @access Public
 */
router.delete(
  "/students/:id",
  asyncWrapper(async (req, res) => {
    const response = await studentService.deleteStudent(req.params.id);
    res.send(response);
  })
);

module.exports = router;
const { Student } = require("../models");

module.exports = class StudentService {
  async registerStudent(data) {
    const { _id, name, city, telephone, birthday } = data;

    const new_student = new Student({
      _id,
      name,
      city,
      telephone,
      birthday
    });

    const response = await new_student.save();
    const res = response.toJSON();
    delete res.__v;
    return res;
  }

  async getAllStudents() {
    return Student.find({}, "_id name city");
  }

  async getStudent(_id) {
    return Student.findById(_id, "-__v -createdAt -updatedAt");
  }

  async updateStudent(_id, { name, city, telephone, birthday }) {
    return Student.findOneAndUpdate(
      { _id },
      {
        name,
        city,
        telephone,
        birthday
      },
      {
        new: true,
        omitUndefined: true,
        fields: "-__v -createdAt -updatedAt"
      }
    );
  }

  async deleteStudent(_id) {
    await Student.deleteOne({ _id });
    return { message: `Student [${_id}] deleted successfully` };
  }
};
So this is it for this tutorial, and we will meet again in a future tutorial about uploading files to MongoDB using GridFS. As usual, you can find the code here (Check for the commit message “Tutorial 3 checkpoint”).
So until we meet again, happy coding…
Read More
tl;dr — This is the second article of the Node is Simple article series. In this article series, I will be discussing how to create a simple and secure NodeJS, Express, MongoDB web application.
Hello, my friends, this is part two of Node is Simple article series, where I will be discussing how to add MongoDB to your web application. If you haven’t read my first article you can read it from here: Node is Simple - Part 1
So what is MongoDB?
If you haven’t heard of MongoDB that is news to me. It is the most popular database for modern web applications. (Yeah, yeah, Firebase, Firestore are there too.) MongoDB is a NoSQL database where it has documents as the atomic data structure and a collection of documents is a Collection. With these documents and collections, we can store data as we want.
{
 "\_id": "5cf0029caff5056591b0ce7d",
 "firstname": "Jane",
 "lastname": "Wu",
 "address": {
     "street": "1 Circle Rd",
     "city": "Los Angeles",
     "state": "CA",
     "zip": "90404"
 },
 "hobbies": \["surfing", "coding"\]
}
This is how a simple document is constructed in MongoDB. For our tutorial, we will use MongoDB Cloud Atlas which is a MongoDB server as a service platform. I am not going to explain how to create an Atlas account and set up a database since it is really easy and the following is a really good reference.
Getting Started with MongoDB Atlas: Overview and Tutorial
After creating the MongoDB account and set up the database obtain the MongoDB URI which looks like this.
**_mongodb+srv://your\_user\_name:your\_password@cluster0-v6q0g.mongodb.net/database\_name_**
You can specify the following with the URI.
your\user_name:_ The username of the MongoDB database
your\password:_ The password for the MongoDB database
database\name:_ The MongoDB database name
Now that you have the MongoDB URI, you can use MongoDB Compass to view the database and create new collections.
Now let’s move on to the coding, shall we?
First of all, let me tell you something awesome about linting. To catch errors in your code, before running any tests, it is vital to do linting. In linting, tools like ESLint, look at your code and displays warnings and errors about your code. So let’s set up ESLint in your development environment.
- Setting up ESLint in VSCode
This is a good reference to setting up ESLint in VSCode: Linting and Formatting with ESLint in VS Code
- Setting up ESLint in WebStorm
First, install ESLint in your project path.
$ npm install eslint --save-dev
There are several ESLint configurations to use. Let’s create .eslintrc.json file in the project root folder and specify the configurations.
{
  "env": {
    "browser": true,
    "commonjs": true,
    "es6": true,
    "node": true
  },
  "extends": ["eslint:recommended"],
  "globals": {
    "Atomics": "readonly",
    "SharedArrayBuffer": "readonly"
  },
  "parserOptions": {
    "ecmaVersion": 2018
  },
  "rules": {}
}
After that go to settings in WebStorm and then select Manual ESLint configuration.
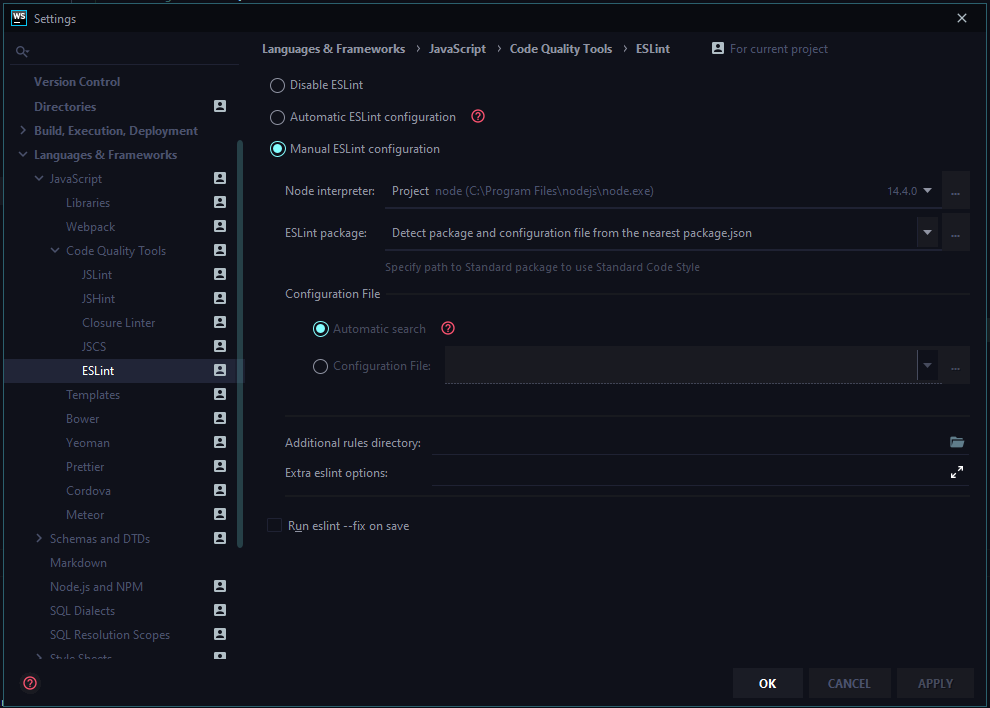
Then click OK and done and dusted.
Show me the Code!!!
Alright, alright, let’s move on to the real deal. Now we are going to create a Mongoose reference for the MongoDB database and create some models. Mongoose is the Object Document Model for the MongoDB in NodeJS environment. It is really easy to use and the documentation is really good. Let me tell you a super-secret. Read the documentation, always read the documentation. Documentation is your best friend. 🤣
So first let's install the mongoose package inside the project folder.
$ npm install mongoose --save
Now let’s create the database connection file index.js in /database folder.
const mongoose = require("mongoose");
const config = require("../config");
const dbPath = config.MONGO_URI;
const chalk = require("chalk");

mongoose
  .connect(dbPath, {
    useNewUrlParser: true,
    useUnifiedTopology: true,
    useCreateIndex: true,
    useFindAndModify: false
  })
  .then(() => {
    console.log(chalk.yellow("[!] Successfully connected to the database"));
  })
  .catch(err => {
    console.log(chalk.red(err.message));
  });

const db = mongoose.connection;

db.on("error", () => {
  console.log(chalk.red("[-] Error occurred from the database"));
});

db.once("open", () => {
  console.log(
    chalk.yellow("[!] Successfully opened connection to the database")
  );
});

module.exports = mongoose;
Now let’s update the /config/index.js file.
const fs = require("fs");

const SERVER_CERT = fs.readFileSync(__dirname + "/server.cert", "utf8");
const SERVER_KEY = fs.readFileSync(__dirname + "/server.key", "utf8");

module.exports = {
  SERVER_CERT,
  SERVER_KEY,
  HTTP_PORT: 8080,
  HTTPS_PORT: 8081,
  MONGO_URI:
    "mongodb+srv://your_user_name:your_password@cluster0-v6q0g.mongodb.net/students"
};
Remember to change the MONGO_URI according to the one you obtained from MongoDB Cloud Atlas instance.
Now let’s create a simple mongoose model. Create index.js inside /models folder.
const mongoose = require("../database");
const Schema = mongoose.Schema;

const studentSchema = new Schema(
  {
    name: { type: mongoose.SchemaTypes.String },
    city: { type: mongoose.SchemaTypes.String }
  },
  { strict: true, timestamps: true }
);

const collectionName = "student";

const Student = mongoose.model(collectionName, studentSchema, collectionName);

module.exports = {
  Student
};
As simple as that. Now let’s create a simple service to create a student using the endpoint. Create index.js file inside /services folder.
const { Student } = require("../models");

module.exports = class StudentService {
  async registerStudent(data) {
    const { name, city } = data;

    const new_student = new Student({
      name,
      city
    });

    const response = await new_student.save();
    const res = response.toJSON();
    delete res.__v;
    return res;
  }
};
Simple right? Now let’s use this service inside a controller. Remember our controller, we created in the first article. Let’s update it.
const router = require("express").Router();
const asyncWrapper = require("../utilities/async-wrapper");
const StudentService = require("../services");
const studentService = new StudentService();

/** @route  GET /
 *  @desc   Root endpoint
 *  @access Public
 */
router.get(
  "/",
  asyncWrapper(async (req, res) => {
    res.send({
      message: "Hello World!",
      status: 200
    });
  })
);

/** @route  POST /register
 *  @desc   Register a student
 *  @access Public
 */
router.post(
  "/register",
  asyncWrapper(async (req, res) => {
    const response = await studentService.registerStudent(req.body);
    res.send(response);
  })
);

module.exports = router;
It’s not over yet. If you run this application as of now and send a POST request to the /register endpoint, it would just return a big error message. It is because our application still doesn’t know how to parse a JSON payload. It would just complain that req.body is undefined. So let’s teach how to parse a JSON payload to our web application. It is not much but it’s honest work. We have to use a simple Express middleware called Body-Parser for this situation. Now let’s set up this.
First, install the following packages inside the project folder.
$ npm install body-parser helmet --save
Create the file common.js inside /middleware folder.
const bodyParser = require("body-parser");
const helmet = require("helmet");

module.exports = app => {
  app.use(bodyParser.json());
  app.use(helmet());
};
Body-Parser is the middleware which parses the body payload. And Helmet is there to secure your web application by setting various security HTTP headers.
After that let’s export our middleware as a combined middleware. Now if we want to add new middleware all we have to do is update the common.js file. Create index.js file inside /middleware folder.
const CommonMiddleware = require("./common");

const Middleware = app => {
  CommonMiddleware(app);
};

module.exports = Middleware;
We are not done yet. Now we have to include this main middleware file inside the index.js root file. Remember we created the index.js file inside the project root folder. Let’s update it.
const express = require("express");
const chalk = require("chalk");
const http = require("http");
const https = require("https");
const config = require("./config");

const HTTP_PORT = config.HTTP_PORT;
const HTTPS_PORT = config.HTTPS_PORT;
const SERVER_CERT = config.SERVER_CERT;
const SERVER_KEY = config.SERVER_KEY;

const app = express();
const Middleware = require("./middleware");
const MainController = require("./controllers");

Middleware(app);
app.use("", MainController);
app.set("port", HTTPS_PORT);

/**
 * Create HTTPS Server
 */

const server = https.createServer(
  {
    key: SERVER_KEY,
    cert: SERVER_CERT
  },
  app
);

const onError = error => {
  if (error.syscall !== "listen") {
    throw error;
  }

  const bind =
    typeof HTTPS_PORT === "string"
      ? "Pipe " + HTTPS_PORT
      : "Port " + HTTPS_PORT;

  switch (error.code) {
    case "EACCES":
      console.error(chalk.red(`[-] ${bind} requires elevated privileges`));
      process.exit(1);
      break;
    case "EADDRINUSE":
      console.error(chalk.red(`[-] ${bind} is already in use`));
      process.exit(1);
      break;
    default:
      throw error;
  }
};

const onListening = () => {
  const addr = server.address();
  const bind = typeof addr === "string" ? `pipe ${addr}` : `port ${addr.port}`;
  console.log(chalk.yellow(`[!] Listening on HTTPS ${bind}`));
};

server.listen(HTTPS_PORT);
server.on("error", onError);
server.on("listening", onListening);

/**
 * Create HTTP Server (HTTP requests will be 301 redirected to HTTPS)
 */
http
  .createServer((req, res) => {
    res.writeHead(301, {
      Location:
        "https://" +
        req.headers["host"].replace(
          HTTP_PORT.toString(),
          HTTPS_PORT.toString()
        ) +
        req.url
    });
    res.end();
  })
  .listen(HTTP_PORT)
  .on("error", onError)
  .on("listening", () =>
    console.log(chalk.yellow(`[!] Listening on HTTP port ${HTTP_PORT}`))
  );

module.exports = app;
Well done people, now we have completed setting up MongoDB connection and the model. So how do we test this? It is so simple, we just have to use a super easy tool called Postman.
Testing API endpoints with Postman
I hope you all know what Postman does. (Not the one that delivers letters ofc.) Install Postman and fire it up.


As in figure 1, change the settings for SSL certificate validation. And set it to off. Since we only have a self-signed SSL certificate. (Remember tutorial one.) After that, we are ready to go.
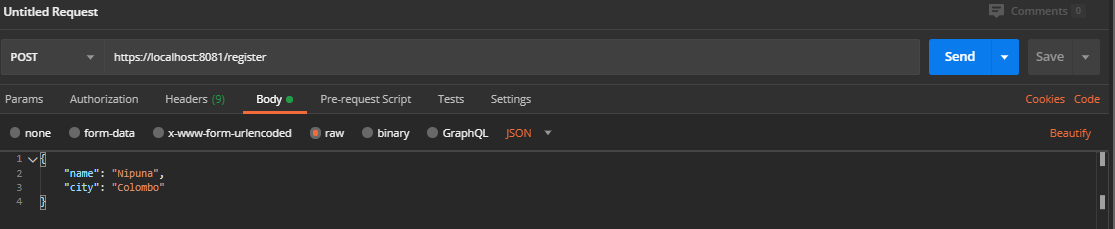
As in figure 2, create your JSON body request. Add your name and city. Then click Send.

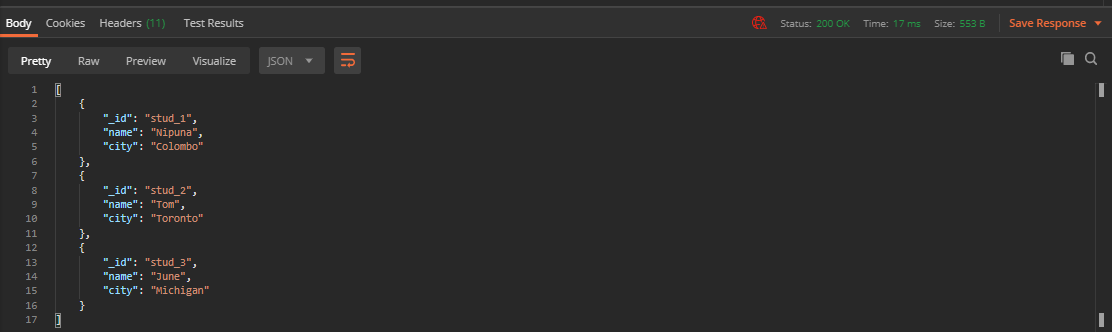
If everything goes as it should, you’ll see this response. If you see this response, voila, everything works correctly. Now let’s take a look at MongoDB Compass.
As in figure 3, you'll see how it shows in the database. Here, the MongoDB database is “students” and the collection is “student” and the document is the one that is showed in the view.
Now that was easy right? So that’s it for this tutorial. In the coming tutorial, I’ll add some more CRUD operations to give you more details on working with MongoDB. All the code is saved in the GitHub repo and matched with the commit message. Look for the commit message “Tutorial 2 checkpoint”.
Until we meet again, happy coding…
Read More
New or latest Node.js features aren’t the usual selling point of this platform. Node.js is primarily well-known for its speed and simplicity. This is why so many companies are willing to give it a shot. However, with the release of a new LTS (long-term support) Node.js 14 version, Node.js will gain a lot of new features every Node.js developer can be excited about. Why? That’s because the new Node.js features added in the version 12 through 14 and the possibilities they create are simply that amazing! Find our more from this Node latest version report.
This article has been updated to reflect the latest changes added in Node.js 14. What you can find here is a thorough overview of the latest Node.js features added in version 12 through 14.
Node + Web Assembly = <3
Web Assembly is slowly gaining in popularity. More and more Node modules are experimenting with this language and so is Node itself! With the upcoming Node 14 release, we will gain access to the experimental Web Assembly System Interface – WASI.
The main idea behind this is to provide us with an easier way to access the underlying operating system. I’m really looking forward to seeing more Web Assembly in Node.
V8 8.1 is here!
I did mention that the new Node comes with the V8. This gives us not only access to the private field, but also some performance optimizations.
Awaits should work much faster, as should JS parsing.
Our apps should load quicker and asyncs should be much easier to debug, because we’re finally getting stack traces for them.
What’s more, the heap size is getting changed. Until now, it was either 700MB (for 32bit systems) or 1400MB (for 64bit). With new changes, it’s based on the available memory!
With the latest Node version 14, we’re getting access to the newest V8. This means that we’re getting some popular features of the JavaScript engine.
If you’re using TypeScript, you probably try nullish coalescing and optional chaining. Both of those are natively supported by Node 14.
We’re also getting a few updates to Intl. The first one is support for Intl.DisplayNames and the second one is support for calendar and numberingSystem for Intl.DateTimeFormat.
Stable Diagnostic Reports
In Node 12, we’ve got a new experimental feature called Diagnostic Reports. By using it, we could easily get a report that contains information about the current system. What’s more, we can generate it not only on demand but also after a certain event.
If you have any production running a Node app, then this is something you should be checking out.
Threads are almost stable!
With the last LTS we’ve got access to threads. Of course, it was an experimental feature and required a special flag called –experimental-worker for it to work.
With the upcoming LTS (Node 12) it’s still experimental, but won’t require a flag anymore. We are getting closer to a stable version!
ES modules support
Let’s face it, ES modules are currently the way to go in JavaScript development. We are using it in our frontend apps. We are using it on our desktop or even mobile apps. And yet, in case of Node we were stuck with common.js modules.
Of course, we could use Babel or Typescript, but since Node.js is a backend technology, the only thing we should care about is a Node version installed on the server. We don’t need to care about multiple different browsers and support for them, so what’s the point of installing a tool that was made precisely with that in mind (Babel/Webpack etc.)?
With Node 10, we could finally play a little with ES modules (current LTS has experimental implementation for modules), but it required us to use special file extension – .mjs (module javascript).
With Node 12, it’s getting a little bit easier to work with. Much like it is with web apps, we get a special property type called that will define if code should be treated like common.js or es module.
The only thing you need to do to treat all your files as a module is to add the property type with the value module to your package.json.
{
  "type": "module"
}
From now on, if this package.json is the closest to our .js file, it will be treated like a module. No more mjs (we can still use it if we want to)!
So, what if we wanted to use some common.js code?
As long as the closest package.json does not contain a module type property, it will be treated like common.js code.
What’s more, we are getting new an extension called cjs – a common.js file.
Every mjs file is treated as a module and every cjs as a common.js file.
If you didn’t have a chance to try it out, now is the time!
Interested in developing microservices? 🤔 Make sure to check out our State of Microservices 2020 report – based on opinions of 650+ microservice experts!
JS and private variables
When it comes to JavaScript, we have always struggled to protect some data in our classes/functions from the outside.
JS is famous for its monkey patching, meaning we could always somehow access almost everything.
We tried with closures, symbols and more to simulate private-like variables. Node 12 ships with the new V8 and so we’ve got access to one cool feature – private properties in the class.
I’m sure you all remember the old approach to privates in Node:
class MyClass {
  constructor() {
    this._x = 10
  }

  get x() {
    return this._x
  }
}
We all know it’s not really a private – we are still able to access it anyway, but most of IDEs treated it like a private field and most of Node devs knew about this convention. Finally, we can all forget about it.
class MyClass {
  #x = 10

  get x() {
    return this.#x
  }
}
Can you see the difference? Yes, we use # character to tell Node that this variable is private and we want it to be accessible only from the inside of this class.
Try to access it directly, you’ll get an error that this variable does not exists.
Sadly some IDE do not recognize them as proper variables yet.
Flat and flatMap
With Node 12, we’re getting access to new JavaScript features.
First of all, we’re getting access to new array methods – flat and flatMap. The first one is similar to Lodash’s flattenDepth method.
If we pass a nested arrays to it, we will get a flatten array as a result.
[10, [20, 30], [40, 50, [60, 70]]].flat() // => [10, 20, 30, 40, 50, [60, 70]]
[10, [20, 30], [40, 50, [60, 70]]].flat(2) // => [10, 20, 30, 40, 50, 60, 70]
As you can see, it also has a special parameter – depth. By using it, you can decide how many levels down you want to flatten.
The second one – flatMap – works just like map, followed by flat 🙂
Optional catch binding
Another new feature is optional catch binding. Until now we always had to define an error variable for try – catch.
try {
  someMethod()
} catch(err) {
  // err is required
}
With Node 12 we can’t skip the entire catch clause, but we can skip the variable at least.
try {
  someMethod()
} catch {
  // err is optional
}
Object.fromEntries
Another new JavaScript feature is the Object.fromEntries method. It’s main usage is to create an object either from Map or from a key/value array.
Object.fromEntries(new Map([['key', 'value'], ['otherKey', 'otherValue']]));
// { key: 'value', otherKey: 'otherValue' }


Object.fromEntries([['key', 'value'], ['otherKey', 'otherValue']]);
// { key: 'value', otherKey: 'otherValue' }
The new Node.js is all about threads!
If there is one thing we can all agree on, it’s that every programming language has its pros and cons. Most popular technologies have found their own niche in the world of technology. Node.js is no exception.
We’ve been told for years that Node.js is good for API gateways and real-time dashboards (e.g. with websockets). As a matter of fact, its design itself forced us to depend on the microservice architecture to overcome some of its common obstacles.
At the end of the day, we knew that Node.js was simply not meant for time-consuming, CPU-heavy computation or blocking operations due to its single-threaded design. This is the nature of the event loop itself.
If we block the loop with a complex synchronous operation, it won’t be able to do anything until it’s done. That’s the very reason we use async so heavily or move time-consuming logic to a separate microservice.
This workaround may no longer be necessary thanks to new Node.js features that debuted in its 10 version. The tool that will make the difference are worker threads. Finally, Node.js will be able to excel in fields where normally we would use a different language.
A good example could be AI, machine learning or big data processing. Previously, all of those required CPU-heavy computation, which left us no choice, but to build another service or pick a better-suited language. No more.
Threads!? But how?
This new Node.js feature is still experimental – it’s not meant to be used in a production environment just yet. Still, we are free to play with it. So where do we start?
Starting from Node 12+ we no longer need to use special feature flag –experimental-worker. Workers are on by default!
node index.js
Now we can take full advantage of the worker_threads module. Let’s start with a simple HTTP server with two methods:
→ GET /hello (returning JSON object with “Hello World” message),
→ GET /compute (loading a big JSON file multiple times using a synchronous method).
const express = require('express');
const fs = require('fs');

const app = express();

app.get('/hello', (req, res) => {
  res.json({
    message: 'Hello world!'
  })
});

app.get('/compute', (req, res) => {
  let json = {};
  for (let i=0;i<100;i++) {
    json = JSON.parse(fs.readFileSync('./big-file.json', 'utf8'));
  }

  json.data.sort((a, b) => a.index - b.index);

  res.json({
    message: 'done'
  })
});

app.listen(3000);
The results are easy to predict. When GET /compute and /hello are called simultaneously, we have to wait for the compute path to finish before we can get a response from our hello path. The Event loop is blocked until file loading is done.
Let’s fix it with threads!
const express = require('express');
const fs = require('fs');
const { Worker, isMainThread, parentPort, workerData } = require('worker_threads');

if (isMainThread) {
  console.log("Spawn http server");

  const app = express();

  app.get('/hello', (req, res) => {
    res.json({
      message: 'Hello world!'
    })
  });

  app.get('/compute', (req, res) => {

    const worker = new Worker(__filename, {workerData: null});
    worker.on('message', (msg) => {
      res.json({
        message: 'done'
      });
    })
    worker.on('error', console.error);
      worker.on('exit', (code) => {
        if(code != 0)
          console.error(new Error(`Worker stopped with exit code ${code}`))
    });
  });

  app.listen(3000);
} else {
  let json = {};
  for (let i=0;i<100;i++) {
    json = JSON.parse(fs.readFileSync('./big-file.json', 'utf8'));
  }

  json.data.sort((a, b) => a.index - b.index);

  parentPort.postMessage({});
}
As you can see, the syntax is very similar to what we know from Node.js scaling with Cluster. But the interesting part begins here.
Try to call both paths at the same time. Noticed something? Indeed, the event loop is no longer blocked so we can call /hello during file loading.
Now, this is something we have all been waiting for! All that’s left is to wait for a stable API.
Want even more new Node.js features? Here is an N-API for building C/C++ modules!
The raw speed of Node.js is one of the reason we choose this technology. Worker threads are the next step to improve it. But is it really enough?
Node.js is a C-based technology. Naturally, we use JavaScript as a main programming language. But what if we could use C for more complex computation?
Node.js 10 gives us a stable N-API. It’s a standardized API for native modules, making it possible to build modules in C/C++ or even Rust. Sounds cool, doesn’t it?
![]() Building native Node.js modules in C/C++ has just got way easier
Building native Node.js modules in C/C++ has just got way easier
A very simple native module can look like this:
#include <napi.h>
#include <math.h>

namespace helloworld {
    Napi::Value Method(const Napi::CallbackInfo& info) {
        Napi::Env env = info.Env();
        return Napi::String::New(env, "hello world");
    }

    Napi::Object Init(Napi::Env env, Napi::Object exports) {
        exports.Set(Napi::String::New(env, "hello"),
                    Napi::Function::New(env, Method));
        return exports;
    }

    NODE_API_MODULE(NODE_GYP_MODULE_NAME, Init)
}
If you have a basic knowledge of C++, it’s not too hard to write a custom module. The only thing you need to remember is to convert C++ types to Node.js at the end of your module.
Next thing we need is binding:
{
    "targets": [
        {
            "target_name": "helloworld",
            "sources": [ "hello-world.cpp"],
            "include_dirs": ["<!@(node -p \"require('node-addon-api').include\")"],
            "dependencies": ["<!(node -p \"require('node-addon-api').gyp\")"],
            "defines": [ 'NAPI_DISABLE_CPP_EXCEPTIONS' ]
        }
    ]
}
This simple configuration allows us to build *.cpp files, so we can later use them in Node.js apps.
Before we can make use of it in our JavaScript code, we have to build it and configure our package.json to look for gypfile (binding file).
{
  "name": "n-api-example",
  "version": "1.0.0",
  "description": "",
  "main": "index.js",
  "scripts": {
    "install": "node-gyp rebuild"
  },
  "gypfile": true,
  "keywords": [],
  "author": "",
  "license": "ISC",
  "dependencies": {
    "node-addon-api": "^1.5.0",
    "node-gyp": "^3.8.0"
  }
}
Once the module is good to go, we can use the node-gyp rebuild command to build and then require it in our code. Just like any popular module we use!
const addon = require('./build/Release/helloworld.node');

console.log(addon.hello());
Together with worker threads, N-API gives us a pretty good set of tools to build high-performance apps. Forget APIs or dashboards – even complex data processing or machine learning systems are far from impossible. Awesome!
Full support for HTTP/2 in Node.js? Sure, why not!
We’re able to compute faster. We’re able to compute in parallel. So how about assets and pages serving?
For years, we were stuck with the good old http module and HTTP/1.1. As more and more assets are being served by our servers, we increasingly struggle with loading times. Every browser has a maximum number of simultaneous persistent connections per server/proxy, especially for HTTP/1.1. With HTTP/2 support, we can finally kiss this problem goodbye.
So where do we start? Do you remember this basic Node.js server example from every tutorial on web ever? Yep, this one:
const http = require('http');

http.createServer(function (req, res) {
  res.write('Hello World!');
  res.end();
}).listen(3000);
With Node.js 10, we get a new http2 module allowing us to use HTTP/2.0! Finally!
const http = require('http2');
const fs = require('fs');

const options = {
  key: fs.readFileSync('example.key'),
  cert: fs.readFileSync('example.crt')
 };

http.createSecureServer(options, function (req, res) {
  res.write('Hello World!');
  res.end();
}).listen(3000);
Full HTTP/2 support in Node.js 10 is what we have all been waiting for
With these new features, the future of Node.js is bright
The new Node.js features bring fresh air to our tech ecosystem. They open up completely new possibilities for Node.js. Have you ever imagined that this technology could one day be used for image processing or data science? Neither have I.
Node latest version gives us even more long-awaited features such as support for es modules (still experimental, though) or changes to fs methods, which finally use promises rather than callbacks.
Want even more new Node.js features? Watch this short video.
As you can see from the chart below, the popularity of Node.js seems to have peaked in early 2017, after years and years of growth. It’s not really a sign of slowdown, but rather of maturation of this technology.
 Popularity of Node.js over time chart, peaked in 2017
However, I can definitely see how all of these new improvements, as well as the growing popularity of Node.js blockchain apps (based on the truffle.js framework), may give Node.js a further boost so that it can blossom again – in new types of projects, roles and circumstances.
With the release of Node.js 14, the future is looking brighter and brighter for Node.js development!
Read More