
Your latest Node.js content, news and updates in one place.

Application containers have emerged as a powerful tool in modern software development. Lighter and more resource efficient than traditional virtual machines, containers offer IT organizations new opportunities in version control, deployment, scaling, and security.
This post will address what exactly containers are, why they are proving to be so advantageous, how people are using them, and best practices for containerizing your Node.js applications with Docker.
What’s a Container?
Put simply, containers are running instances of container images. Images are layered alternatives to virtual machine disks that allow applications to be abstracted from the environment in which they are actually being run. Container images are executable, isolated software with access to the host's resources, network, and filesystem. These images are created with their own system tools, libraries, code, runtime, and associated dependencies hardcoded. This allows for containers to be spun up irrespective of the surrounding environment. This everything-it-needs approach helps silo application concerns, providing improved systems security and a tighter scope for debugging.
Unlike traditional virtual machines, container images give each of its instances shared access to the host operating system through a container runtime. This shared access to the host OS resources enables performance and resource efficiencies not found in other virtualization methods.
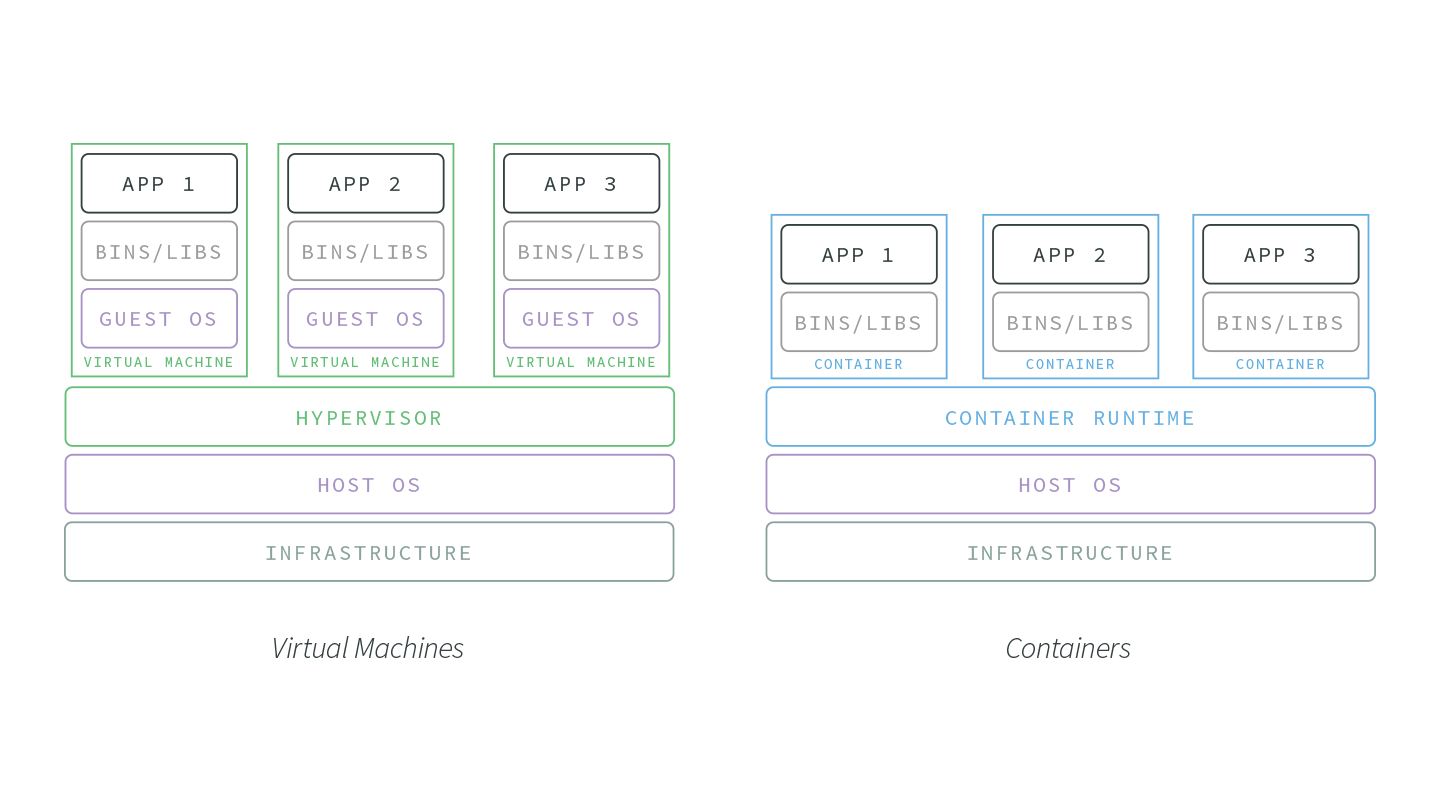
Imagine a container image that requires 500 mb. In a containerized environment, this 500 mb can be shared between hundreds of containers assuming they are are all running the same base image. VMs, on the other hand, would need that 500 mb per virtual machine. This makes containers much more suitable for horizontal scaling and resource-restricted environments.
Why Application Containers?
The lightweight and reproducible nature of containers have made them an increasingly favored option for organizations looking to develop software applications that are scalable, highly available, and version controlled.
Containers offer several key advantages to developers:
- Lightweight and Resource Efficient. Compared to VMs, which generate copies of their host operating system for each application or process, containers have significantly less of an impact on memory, CPU usage, and disk space.
- Immutable. Containers are generated from a single source of truth, an image. If changes are committed to an image, a new image is made. This makes container image changes easy to track, and deployment rollbacks intuitive. The reproducibility and stability of containers helps development teams avoid configuration drift, making things like version testing and mirroring development and production environments much simpler.
- Portable. The isolated and self-reliant nature of containers makes them a great fit for applications that need to operate across a host of services, platforms, and environments. They can run on Linux, Windows, and macOS. Provide them from the cloud, on premise, or wherever your infrastructure dictates.
- Scalable and Highly Available. Containers are easily reproducible and can be made to dynamically respond to traffic demands, with orchestration services such as Azure Container Instances, Google Cloud Engine, and Amazon ECS making it simpler than ever to generate or remove containers from your infrastructure.
Application Container Use Cases
Not all applications and organizations are going to have the same infrastructure requirements. The aforementioned benefits of containers make them particularly adept at addressing the following needs:
DevOps Organizations
For teams working to practice ‘infrastructure as code’ and seeking to embrace the DevOps paradigm, containers offer unparalleled opportunities. Their portability, resistance to configuration drift, and quick boot time make containers an excellent tool for quickly and reproducibly testing different code environments, regardless of machine or location.
Microservice and Distributed Architectures
A common phrase in microservice development is “do one thing and do it well,” and this aligns tightly with application containers. Containers offer a great way to wrap microservices and isolate them from the wider application environment. This is very useful when wanting to update specific (micro-)services of an application suite without updating the whole application.
A/B testing
Containers make it easy to roll out multiple versions of the same application. When coupled with incremental rollouts, containers can keep your application in a dynamic, responsive state to testing. Want to test a new performance feature? Spin up a new container, add some updates, route 1% of traffic to it, and collect user and performance feedback. As the changes stabilize and your team decides to apply it to the application at large, containers can make this transition smooth and efficient.
Containers and Node.js
Because of application containers suitability for focused application environments, Node.js is arguably the best runtime for containerization.
- Explicit Dependencies. Containerized Node.js applications can lock down dependency trees, and maintain stable package.json, package-lock.json, or npm-shrinkwrap.json files.
- Fast Boot and Restart. Containers are lightweight and boot quickly, making them a strategic pair for Node.js applications. One of the most lauded features of Node.js is its impressive startup time. This robust boot performance gets terminated processes restarted quickly and applications stabilized; containerization provides a scalable solution to maintaining this performance.
- Scaling at the Process Level. Similar to the Node.js best practice of spinning up more processes instead of more threads, a containerized environment will scale up the number of processes by increasing the number of containers. This horizontal scaling creates redundancy and helps keep applications highly available, without the significant resource cost of a new VM per process.
Dockerizing Your Node.js Application
Docker Overview
Docker is a layered filesystem for shipping images, and allows organizations to abstract their applications away from their infrastructure.
With Docker, images are generated via a Dockerfile. This file provides configurations and commands for programmatically generating images.
Each Docker command in a Dockerfile adds a ‘layer’. The more layers, the larger the resulting container.
Here is a simple Dockerfile example:
1    FROM node:8
2
3    WORKDIR /home/nodejs/app
4
5    COPY . .
6    RUN npm install --production
7
8    CMD [“node”, “index.js”]
The FROM command designates the base image that will be used; in this case, it is the image for Node.js 8 LTS release line.
The RUN command takes bash commands as its arguments. In Line 2 we are creating a directory to place the Node.js application. Line 3 lets Docker know that the working directory for every command after line 3 is going to be the application directory.
Line 5 copies everything the current directory into the current directory of the image, which is /home/nodejs/app previously set by the WORKDIR command in like 3. On Line 6, we are setting up the production install.
Finally, on line 8, we pass Docker a command and argument to run the Node.js app inside the container.
The above example provides a basic, but ultimately problematic, Dockerfile.
In the next section we will look at some Dockerfile best practices for running Node.js in production.
Dockerfile Best Practices
Don’t Run the Application as root
Make sure the application running inside the Docker container is not being run as root.
1   FROM node:8
2
3   RUN groupadd -r nodejs && useradd -m -r -g -s /bin/bash nodejs nodejs
4
5   USER nodejs
6
7   ...
In the above example, a few lines of code have been added to the original Dockerfile example to pull down the image of the latest LTS version of Node.js, as well as add and set a new user, nodejs. This way, in the event that a vulnerability in the application is exploited, and someone manages to get into the container at the system level, at best they are user nodejs which does not have root permissions, and does not exist on the host.
Cache node_modules
Docker builds each line of a Dockerfile individually. This forms the 'layers' of the Docker image. As an image is built, Docker caches each layer.
7   ...
8     WORKDIR /home/nodejs/app
9
10  COPY package.json .
12  RUN npm install --production
13  COPY . .
14
15  CMD [“node.js”, “index.js”]
16  ...
On line 10 of the above Dockerfile, the package.json file is being copied to the working directory established on line 8. After the npm install on line 12, line 13 copies the entire current directory into the working directory (the image).
If no changes are made to your package.json, Docker won’t rebuild the npm install image layer, which can dramatically improve build times.
Setup Your Environment
It’s important to explicitly set any environmental variables that your Node.js application will be expecting to remain constant throughout the container lifecycle.
12  ...
13  COPY . .
14
15  ENV  NODE_ENV production
16
17  CMD [“node.js”, “index.js”]
18
With aims of comprehensive image and container services, DockerHub “provides a centralized resource for container image discovery, distribution and change management, user and team collaboration, and workflow automation throughout the development pipeline.”
To link the Docker CLI to your DockerHub account, use
docker login:docker login [OPTIONS] [SERVER]
Private GitHub Accounts and npm Modules
Docker runs its builds inside of a sandbox, and this sandbox environment doesn’t have access to information like ssh keys or npm credentials. To bypass this constraint, there are a couple recommended options available to developers:
- Store keys and credentials on the CI/CD system. The security concerns of having sensitive credentials inside of the Docker build can be avoided entirely by never putting them in there in the first place. Instead, store them on and retrieve them from your infrastructure’s CI/CD system, and manually copy private dependencies into the image.
- Use an internal npm server. Using a tool like Verdaccio, setup an npm proxy that keeps the flow of internal modules and credentials private.
Be Explicit with Tags
Tags help differentiate between different versions of images. Tags can be used to identify builds, teams that are working on the image, and literally any other designation that is useful to an organization for managing development of and around images. If no tag is explicitly added, Docker will assign a default tag of latest after running docker build. As a tag, latestis okay in development, but can be very problematic in staging and production environments.
To avoid the problems around latest, be explicit with your build tags. Here is an example script assigning tags with environment variables for the build’s git sha, branch name, and build number, all three of which can be very useful in versioning, debugging, and deployment management:
1   # !/bin/sh
2   docker tag helloworld:latest yourorg/helloworld:$SHA1
3   docker tag helloworld:latest yourorg/helloworld:$BRANCH_NAME
4   docker tag helloworld:latest yourorg/build_$BUILD_NUM
5
Read more on tagging here.
Containers and Process Management
Containers are designed to be lightweight and map well at the process level, which helps keep process management simple: if the process exits, the container exits. However, this 1:1 mapping is an idealization that is not always maintained in practice.
As Docker containers do not come with a process manager included, add a tool for simple process management.
dumb-init from Yelp is a simple, lightweight process supervisor and init system designed to run as PID 1 inside container environments. This PID 1 designation to the dumb-init process is normally assigned to a running Linux container, and has its own kernel-signaling idiosyncrasies that complicate process management. dumb-init provides a level of abstraction that allows it to act as a signal proxy, ensuring expected process behavior.
What to Include in Your Application Containers
A principal advantage of containers is that they provide only what is needed. Keep this in mind when adding layers to your images.
Here is a checklist for what to include when building container images:
- Your application code and its dependencies.
- Necessary environment variables.
- A simple signal proxy for process management, like dumb-init.
That’s it.
Conclusion
Containers are a modern virtualization solution best-suited for infrastructures that call for efficient resource sharing, fast startup times, and rapid scaling.
Application containers are being used by DevOps organizations working to implement “infrastructure as code,” teams developing microservices and relying on distributed architectures, and QA groups leveraging strategies like A/B testing and incremental rollouts in production.
Just as the recommended approach for single-threaded Node.js is 1 process: 1 application, best practice for application containers is 1 process: 1 container. This mirrored relationship arguably makes Node.js the most suitable runtime for container development.
Docker is an open platform for developing, shipping, and running containerized applications. Docker enables you to separate your applications from your infrastructure so you can deliver software quickly. When using Docker with Node.js, keep in mind:
- Don’t run the application as
root - Cache
node_modules - Use your CI/CD system or an internal server to keep sensitive credentials out of the container image
- Be explicit with build tags
- Keep containers light!
One Last Thing
If you’re interested in deploying Node.js applications within Docker containers, you may be interested in N|Solid. We work to make sure Docker is a first-class citizen for enterprise users of Node.js who need insight and assurance for their Node.js deployments.
Deploying N|Solid with Docker is as simple as changing your FROM statement!
If you’d like to tune into the world of Node.js, Docker, Kubernetes, and large-scale Node.js deployments, be sure to follow us at @NodeSource on Twitter.

As part of the NodeSource Support team, I spend much of my time helping our customers analyze and resolve complex issues in Node.js. While factors like architecture and environment mean that some issues are quite unique, there are some familiar struggles that we’ve seen repeatedly from a wide variety of customers. I’ve listed a few of these common and relatively easy-to-avoid challenges below, along with our recommended strategy for avoiding (or resolving) these issues, as I think this information could help more teams working with Node.js avoid major headaches.
Sharing components, modules, or libraries between projects
Issue
The Support team frequently sees questions about the most effective way to share the components, models, and/or libraries between projects. In some cases, our customers are already using Flow and Stampit, which are useful tools for ReactJs components, and they’re looking for tools with less complexity built for Node.js codebases.
Answer
When this question comes up, we usually recommend turning each component (or model, or library) into a module and listing these in each project’s package.json file. This allows teams to share code across unified codebases by re-using localized modules.
Importing these components to a project can be accomplished with a fairly simple addition to the project’s package.json file:
“db-models”: “file:../mainproject/models”,
To use this approach, make sure you are using npm@5, or use the linklocal package for earlier npm versions.
Fixing cookie violations in Node.js with Express
Issue
Many teams have web scans to identify and analyze cookie violations in their Node.js environments when Express is also part of their tech stack. Some of the most common cookie violations found are:
- Cookie No
httpOnlyFlag - Cookie Without
secureFlag: if set to true, “the browser will not send a cookie with the secure flag set over an unencrypted HTTP request”
We’re frequently asked how best to set the HttpOnly and secure flags for cookies, and whether that can be done at the server level.
Answer
The default cookie settings in Express aren’t highly secure; however, these settings can be manually tightened to enhance security - for both an application and its users.
httpOnly- This should be set to “true”-- Flags cookies to be accessible by the issuing web server, which assists in preventing session hijacking.secure- This should be set to “true”-- which requires TLS/SSL -- to allow the cookie to only be used with HTTPS requests, and not insecure HTTP requests. For more information about how to deal with this issue, I recommend checking out these two blog posts:- 9 Security Tips to Keep Express from Getting Pwned - NodeSource
- Security Best Practices for Express in Production
Migrate a Java service to Node.js for specific tasks
Issue
We often talk to teams who are working to migrate individual tasks or functionality from Java into a microservices-oriented Node.js application. The best practices approach is to replace a single, monolithic Java app with multiple Node.js apps, each of which is dedicated to a specific task or closely-related set of tasks. We’re frequently asked to recommend a library or pattern that will allow a Node.js app to read from an OracleDB and push to an MQ-enabled application.
Answer
To connect to an OracleDB, we recommend the node-oracledb package, which is developed and maintained by Oracle and includes detailed documentation and examples.
There are a number of ways to access MQ from Node.js, depending on your needs:
- Take a look at the MQ Light client. MQ supports connections from MQ Light clients via AMQP channels.
- MQTT.js is a client library for the MQTT protocol. MQ supports connections from MQTT clients via the XR service and Telemetry channels.
- MQ versions 9.0.4 and higher include a simple REST API for messaging that is accessible from any environment.
When migrating from a Java project or starting a new Node.js project we also recommend:
Don’t use console.log or console.error; instead utilize an abstraction library like Winston to control logging levels.
Set the ability to adjust logging level using env variables
Identify the most appropriate package for your needs.
Issue
The npm registry contains more than 800,000 packages, so it’s not surprising that teams have a hard time deciding which package offers both the features and functionality as well as the level of security that is most suitable for their Node.js applications. Among the most common asks we see are recommendations related to creating pdfs, managing RxJS and Promises, and setting up proxy servers and http error handling. That said, needs vary wildly by project, so the advice below is intended to be generally applicable.
Answer
There are a few tools in the Node ecosystem that allow easy checking for vulnerabilities in Node.js application dependencies. These tools are highly valuable in as they can ensure that the packages installed in an application have no known vulnerabilities, and can prevent the installation of package updates if a vulnerability has been detected in a more recent package version.
Once basic security checks have been passed, we recommend looking for the following factors to help you decide which package is best:
- Consistent, ongoing activity in the source code repository
- Acceptable resolution time for issues reported by other users (what is “acceptable” might vary depending on your application and needs)
- The frequency (and recency) of releases which include fixes and new features are released
- Presence of up-to-date documentation of the package code and features, ideally with examples
- Do a general code check to ensure all the features you’ll need are working as expected
Increase the data submission limit in HTTP responses
Issue
For teams using Node.js and Express, we often hear that a POST request containing a large body of JSON is returning a 413: Payload Too Large response. Most of the time, the engineers we talk to want to know how to safely increase the size limit of the request body.
Answer
There are multiple ways to safely increase the size limit of the request body.
For a quick fix, either of the following two options would work:
app.use(BodyParser.json({ limit: ‘50mb’, type: ‘application/json’ }))
app.use(BodyParser.urlencoded({ limit: ‘50mb’, ‘extended’: ‘true’, parameterLimit: 50000 }));
Both of the above examples raise the maximum size of the request body to 50mb; in the second example, the parameterLimit value is also defined.
While a quick fix will work, implementing a caching solution with Redis is a good option too. The idea is to store the data in cache and then send a reference from the client to the data instead of sending a big payload.
Similarly, you will not need to receive back a massive amount of data in JSON format; instead, you send the reference from the client and retrieve the cached info at the backend. This allows comparatively lightweight requests and avoids a negative impact on the performance of the application.
Hopefully the suggestions above help your team resolve (or avoid entirely) some of the most common issues reported by our Node.js Support customers. If you have questions or are experiencing an issue not covered above, feel free to contact us on Twitter @NodeSource, or consider joining one of our upcoming Office Hours sessions, which are hosted by one of our senior Solutions Architects and open to anyone with Node.js-related questions.
Read More
This article was first published in NodeSource blog on March 2017.
The package.json file is core to the Node.js ecosystem and is a basic part of understanding and working with Node.js, npm, and even modern JavaScript. The package.json is used as what equates to a manifest about applications, modules, packages, and more - it's a tool to that's used to make modern development streamlined, modular, and efficient.
As a developer in the Node.js ecosystem, understanding the basics of package.json is one of the first steps to really kicking off your development experience with Node.js.
Because of how essential understanding the basics of package.json is to development with Node.js, I've gone through and outlined some of the most common and important properties of a package.json file that you'll need to use package.json effectively.
Identifying Metadata Inside package.json
The name property
The name property in a package.json file is one of the fundamental components of the package.json structure. At its core, name is a string that is exactly what you would expect - the name of the module that the package.json is describing.
Inside your package.json, the name property as a string would look something like this:
"name": "metaverse"
Despite having only a few material restrictions (a max length of 214 characters, can't begin with . or _, no uppercase letters, and no characters that aren't URL-friendly), one interesting aspect of the name property is that, there have been software ecosystems that have developed standard naming conventions that enable discoverability simply by using the name property.
A few examples of this kind of namespacing are babel-plugin- for Babel and the the webpack -loader tooling.
The version property
The version property is a key part of a package.json, as it denotes the current version of the module that the package.json file is describing.
While the version property isn't required to follow semver, semver is the standard used by the vast majority of modules and projects in the Node.js ecosystem - and the module version, according to semver, is what you'll typically find in the version property of a package.json file.
Inside your package.json, the version property as a string using semver could look like this:
"version": "5.12.4"
The license property
The license property of a package.json file is used to note what license the module that the package.json file is describing. While there are some complex ways you can use the license property of a package.json file (to do things like dual-licensing or defining your own license), the most typical usage of it is to use a SPDX License identifier - some examples that you may recognize are MIT, ISC, and GPL-3.0.
Inside your package.json, the license property with an MIT license look like this:
"license": "MIT"
The description property
The description property of a package.json file is a string that contains a human-readable description about the module - basically, it's the module developer's chance to quickly let users know what exactly a module does. The description property is frequently indexed by search tools like npm search and the npm CLI search tool to help find relevant packages based on a search query.
Inside your package.json, the description property would look like this:
"description": "The Metaverse virtual reality. The final outcome of all virtual worlds, augmented reality, and the Internet."
The keywords property
The keywords property inside a package.json file is, as you may have guessed, a collection of keywords about a module. Keywords can help identify a package, related modules and software, and concepts.
The keywords property is always going to be an array, with one or more strings as the array's values - each one of these strings will, in turn, be one of the project's keywords.
Inside your package.json, the keywords array would look something like this:
    "keywords": [
        "metaverse",
        "virtual reality",
        "augmented reality",
        "snow crash"
    ]
Functional Metadata Inside package.json
The main property
The main property of a package.json is a direction to the entry point to the module that the package.json is describing. In a Node.js application, when the module is called via a require statement, the module's exports from the file named in the main property will be what's returned to the Node.js application.
Inside your package.json, the main property, with an entry point of app.js, would look like this:
"main": "app.js",
The repository property
The repository property of a package.json is an array that defines where the source code for the module lives. Typically, for open source projects, this would be a public GitHub repo, with the repository array noting that the type of version control is git, and the URL of the repo itself. One thing to note about this is that it's not just a URL the repo can be accessed from, but the full URL that the version control can be accessed from.
Inside your package.json, the repository property would look like this:
  "repository": {
      "type": "git",
      "url": "https://github.com/bnb/metaverse.git"
  }
The scripts property
The scripts property of a package.json file is simple conceptually, but is complex functionally to the point that it's used as a build tool by many.
At its simplest, the scripts property takes an object with as many key/value pairs as desired. Each one of the keys in these key/value pairs is the name of a command that can be run. The corresponding value of each key is the actual command that is run. Scripts are frequently used for testing, building, and streamlining of the needed commands to work with a module.
Inside your package.json, the scripts property with a build command to execute node app.js (presumably to build your application) and a test command using Standard would look like this:
    "scripts": {
        "build": "node app.js",
        "test": "standard"
    }
The dependencies property
The dependencies property of a module's package.json is where dependencies - the other modules that this module uses - are defined. The dependencies property takes an object that has the name and version at which each dependency should be used. Tying things back to the version property defined earlier, the version that a module needs is defined. Do note that you'll frequently find carets (^) and tildes (~) included with package versions. These are the notation for version range - taking a deep-dive into these is outside the scope of this article, but you can learn more in our primer on semver.
Inside your package.json, the dependencies property of your module may look something like this:
  "dependencies": {
    "async": "^0.2.10",
    "npm2es": "~0.4.2",
    "optimist": "~0.6.0",
    "request": "~2.30.0",
    "skateboard": "^1.5.1",
    "split": "^0.3.0",
    "weld": "^0.2.2"
  },
The devDependencies property
The devDependencies property of a package.json is almost identical to the dependencies property in terms of structure, with a key difference. The dependencies property is used to define the dependencies that a module needs to run in production. The devDependencies property is usually used to define the dependencies the module needs to run in development.
Inside your package.json, the devDependencies property would look something like this:
    "devDependencies": {
        "escape-html": "^1.0.3",
        "lucene-query-parser": "^1.0.1"
    }
Want to keep going?
If you want to keep learning about Node.js, npm, package.json, and development with the Node.js stack, I've got some awesome articles for you.
We also have a guide on some great utilities for Node.js developers - if you want to kick your developer experience to 11, be sure to check it out to find some tools to help you get there.
The goal with this guide was to help kickstart you with package.json for development with Node.js and npm. If you want to take the leap and ensure that you're always on solid footing with Node.js and npm modules, you should check out NodeSource Certified Modules - an awesome tool to help ensure that you spend more time building applications and less time worrying about modules.

This article was first published in NodeSource blog on February 2017.
Using npm effectively is a cornerstone of modern web development, no matter if it's exclusively with Node.js, as a package manager or build tool for the front-end, or even as a piece of workflows in other languages and on other platforms.
Really understanding npm as a tool, understanding the core concepts, can be something that's difficult for a beginner - I spent many hours just trying to figure out small details that would seem minor or be taken for granted by others.
As such, I've written up a basic and detailed guide for understanding npm, for those who are entirely new to Node.js, npm, and the surrounding ecosystem.
An Absolute Beginner's Guide to package.json
As a general rule, any project that's using Node.js will need to have a package.json file. What is a package.json file?
At its simplest, a package.json file can be described as a manifest of your project that includes the packages and applications it depends on, information about its unique source control, and specific metadata like the project's name, description, and author.
Let's break down the core parts of a typical package.json file:
Specific Metadata: name, version, description, license, and keywords
Inside a package.json, you'll almost always find metadata specific to the project - no matter if it's a web application, Node.js module, or even just a plain JavaScirpt library. This metadata helps identify the project and acts as a baseline for users and contributors to get information about the project.
Here's an example of how these fields would look in a package.json file:
{
  "name": "metaverse", // The name of your project
  "version": "0.92.12", // The version of your project
  "description": "The Metaverse virtual reality. The final outcome of all virtual worlds, augmented reality, and the Internet.", // The description of your project
  "main": "index.js"
  "license": "MIT" // The license of your project
}
A package.json file is always structured in the JSON format, which allows it to be easily read as metadata and parsed by machines.
If needing to format a package.json file manually to get your project up and running seems a bit daunting, there's a handy command that will automatically generate a base package.json file for you - if you'd like to learn how to use it, take a peek at the npm init instructions below!
Understanding and Managing Your Project's Dependencies: dependencies and devDepenendcies in your package.json
The other majorly important aspect of a package.json is that it contains a collection of any given project's dependencies. These dependencies are the modules that the project relies on to function properly.
Having dependencies in your project's package.json allows the project to install the versions of the modules it depends on. By running an install command (see the instructions for npm install below) inside of a project, you can install all of the dependencies that are listed in the project's package.json - meaning they don't have to be (and almost never should be) bundled with the project itself.
Second, it allows the separation of dependencies that are needed for production and dependencies that are needed for development. In production, you're likely not going to need a tool to watch your CSS files for changes and refresh the app when they change. But in both production and development, you'll want to have the modules that enable what you're trying to accomplish with your project - things like your web framework, API tools, and code utilities.
What would a project's package.json look like with dependencies and devDependencies? Let's expand on the previous example of a package.json to include some.
{
  "name": "metaverse",
  "version": "0.92.12",
  "description": "The Metaverse virtual reality. The final outcome of all virtual worlds, augmented reality, and the Internet.",
  "main": "index.js"
  "license": "MIT",
  "devDependencies": {
    "mocha": "~3.1",
    "native-hello-world": "^1.0.0",
    "should": "~3.3",
    "sinon": "~1.9"
  },
  "dependencies": {
    "fill-keys": "^1.0.2",
    "module-not-found-error": "^1.0.0",
    "resolve": "~1.1.7"
  }
}
One key difference between the dependencies and the other common parts of a package.json is that they're both objects, with multiple key/value pairs. Every key in both dependencies and devDependencies is a name of a package, and every value is the version range that's acceptable to install (according to Semantic Versioning - to learn more about Semantic Versioning, also known as semver, check out our primer on semver).
The Essential npm Commands
When using npm, you're most likely going to be using the command line tool for the majority of your interactions. As such, here's a detailed rundown of the commands that you'll encounter and need to use most frequently.
Using npm init to Initialize a Project
The npm init command is a step-by-step tool to scaffold out your project. It will prompt you for input for a few aspects of the project in the following order:
- The project's name,
- The project's initial version,
- The project's description,
- The project's entry point (meaning the project's main file),
- The project's test command (to trigger testing with something like Standard)
- The project's git repository (where the project source can be found)
- The project's keywords (basically, tags related to the project)
- The project's license (this defaults to ISC - most open-source Node.js projects are MIT)
It's worth noting that if you're content with the suggestion that the npm init command provides next to the prompt, you can simply hit Return or Enter to accept the suggestion and move on to the next prompt.
Once you run through the npm init steps above, a package.json file will be generated and placed in the current directory. If you run it in a directory that's not exclusively for your project, don't worry! Generating a package.json doesn't really do anything, other than create a package.json file. You can either move the package.json file to a directory that's dedicated to your project, or you can create an entirely new one in such a directory.
How to use npm init:
npm init # This will trigger the initialization
Using npm init --yes to Instantly Initialize a Project
If you want to get on to building your project, and don't want to spend the (albeit brief) time answering the prompts that come from npm init, you can use the --yes flag on the npm init command to automatically populate all options with the default npm init values.
Note: You can configure what these default values are with the npm configuration - that's a more advanced topic, and outside the scope of this beginner's guide to npm.
That said, if you're interested in setting that up, you can learn how to set these defaults in the eleventh tip of our npm tricks article.
Usage:
npm init --yes # This will trigger automatically populated initialization.
Install Modules with npm install
Installing modules from npm is one of the most basic things you should learn to do when getting started with npm. As you dive deeper, you'll begin to learn some variations on installing modules, but here's the very core of what you need to know to install a standalone module into the current directory:
npm install <module>
In the above command, you'd replace <module> with the name of the module you want to install. For example, if you want to install Express (the most used and most well known Node.js web framework), you could run the following command:
npm install express
The above command will install the express module into /node_modules in the current directory. Whenever you install a module from npm, it will be installed into the node_modules folder.
In addition to triggering an install of a single module, you can actually trigger the installation of all modules that are listed as dependencies and devDependencies in the package.json in the current directory. To do so, you'll simply need to run the command itself:
npm install
Once you run this, npm will begin the installation process of all of the current project's dependencies.
As an aside, one thing to note is that there's an alias for npm install that you may see in the wild when working with modules from the ecosystem. The alias is npm i, where i takes the place of install.
This seemingly minor alias is a small gotcha for beginners - including myself, several times when I was learning - to the Node.js and npm ecosystems, as there's not a standardized, single way that module creators and maintainers will instruct on how to install their module.
Usage:
npm install <module> # Where <module> is the name of the module you want to install
npm i <module> # Where <module> is the name of the module you want to install - using the i alias for installation
Install modules and save them to your package.json as a dependency
As with npm init, the npm install command has a flag or two that you'll find useful in your workflow - it'll save you time and effort with regard to your project's package.json file.
When you're running npm install to install a module, you can add the optional flag --save to the command. This flag will add the module as a dependency of your project to the project's package.json as an entry in dependencies.
Usage:
npm install <module> --save # Where <module> is the name of the module you want to install
Install Modules and Save Them to Your package.json as a Developer dependency
There's a flag that is nearly an exact duplicate, in terms of functionality, of the --save flag when installing a module: --save-dev. There are a few a key differences between the two - instead of saving the module being installed and added to package.json as an entry in dependencies, it will save it as an entry in the devDependencies.
The semantic difference here is that dependencies are for use in production - whatever that would entail for your project. On the other hand, devDependencies are a collection of the dependencies that are used in development of your application - the modules that you use to build it, but don't need to use when it's running. This could include things like testing tools, a local server to speed up your development, and more.
Usage:
npm install <module> --save-dev # Where <module> is the name of the module you want to install
Install Modules Globally on your System
The final, and most common, flag for npm install that you should are the flags to install a module globally on your system.
Global modules can be extremely useful - there are tons tools, utilities, and more for both development and general usage that you can install globally to use.
To install a module from npm globally, you'll simply need to use the --global flag when running the install command to have the module install globally, rather than locally (to the current directory).
Note: One caveat with global modules is that, by default, npm will install them to a system directory, not a local one. With this as the default, you'll need to authenticate as a privileged user on your system to install global modules.
As a best practice, you should change the default installation location from a system directory to a user directory. If you'd like to learn to do this, take a peek at the seventh tip in our npm tricks article!
Usage:
npm install <module> --global # Where <module> is the name of the module you want to install globally
npm install <module> -g # Where <module> is the name of the module you want to install globally, using the -g alias
Want to keep going?
If you want to keep learning about npm and all its facets, I've got a few awesome things for you. A bit ago, we shared a few npm tricks to knock your wombat socks off. Even better, we wrote a follow-up with even more npm tricks! This beginner's guide is a great springboard to get off the ground, and both of those will help you start optimizing your work with npm! If you'd like to go even further with npm and start deploying Node.js apps and npm modules into production, you should definitely take a look at NodeSource Certified Modules - it's an awesome tool that'll compliment your newly acquired npm skills!
Read More
This article was first published in NodeSource blog on February 2017.
As with any programming language, platform, or tool that doesn't come bundled with Windows, getting up and running with Node.js takes some initial setup before you can start hacking away. In my experience, though Node.js has a far better installation experience on Windows than virtually any other language, platform, or tool that I've tried to use - just run the installer, and you're good to go.
In this quick tutorial, we'll take a look at how to get Node.js installed on Windows. Once we've completed the entirety of the tutorial, you'll be ready to take the next step with Node.js.
This guide covers installing Node.js on the following versions of Windows: Windows 7, Windows 8, Windows 8.1, and Windows 10. These are the versions that are consistently tested and supported by the Node.js build process at the time of writing.
Step 0: The Quick Guide (TL;DR) to Get Node.js Installed on Windows
Here's the abbreviated guide, highlighting the major steps:
- Open the official page for Node.js downloads and download Node.js for Windows by clicking the "Windows Installer" option
-
Run the downloaded Node.js
.msiInstaller - including accepting the license, selecting the destination, and authenticating for the install.- This requires Administrator privileges, and you may need to authenticate
- To ensure Node.js has been installed, run
node -vin your terminal - you should get something likev6.9.5 - Update your version of npm with
npm install npm --global - This requires Administrator privileges, and you may need to authenticate
- Congratulations - you've now got Node.js installed, and are ready to start building!
Step 1: Download the Node.js .msi Installer
As the first step to installing Node.js on Windows, you'll need to download the installer. You'll be able to grab the installer from the official downloads page for Node.js.
You'll be able to download the Windows Node.js installer by clicking the Windows Installer option at the top of the page - when you click this, you'll get an MSI installer download. Make sure to save it somewhere that you'll be able to find it!
Step 2: Run the Node.js Installer
You've got the Windows Installer - great! Now, you need to install it on your PC. The installer is a pretty typical Wizard interface for installing software on Windows - there are a few steps to it, but you can have it done in under a minute. You can get through it by following the guide below:
-
Welcome to the Node.js Setup Wizard
- Select
Next
- Select
-
End-User License Agreement (EULA)
- Check
I accept the terms in the License Agreement - Select
Next
- Check
-
Destination Folder
- Select
Next
- Select
-
Custom Setup
- Select
Next
- Select
-
Ready to install Node.js
- Select
Install - Note: This step requires Administrator privlidges.
- If prompted, authenticate as an Administrator
- Select
-
Installing Node.js
- Let the installer run to completion
-
Completed the Node.js Setup Wizard
- Click
Finish
- Click
Step 3: Verify that Node.js was Properly installed
To double check that Node.js was installed fully on your PC, you can test the following command in your Command Prompt (regardless of if you're using cmd.exe, Powershell, or any other command prompt):
$ node -v
If Node.js was installed fully, the command prompt will print something similar to (but probably not exactly) this:
$ node -v // The command we ran - prints out the version of Node.js that's currently installed
v6.9.5 // The printed version of Node.js that's currently installed - v6.9.5 was the most current LTS release at the time of writing.
Step 4: Update the Local npm Version
As the final step in getting Node.js installed, we'll update your version of npm - the package manager that comes bundled with Node.js.
Node.js always ships with a specific version of npm - Node.js doesn't (and shouldn't!) automatically update npm. The release cycle of the npm CLI client isn't in sync with the Node.js releases. Because of this, there's almost certainly going to be a newer version of npm available than the one that is installed as a default in any given Node release.
To quickly and easily update npm, you can run the following command:
npm install npm --global // Update the `npm` CLI client
Step 5: Go build applications, APIs, tools, and more with Node.js!
Now you've got Node.js on Windows machine. It's time to start exploring!
Luckily, we've got your back. We've written a bunch of articles to help you get started with Node.js! If you're interested in exploring ES6, you should check out our article on some of the most exciting ES6 features in Node.js. If you're interested in ways to collaborate with your team a bit better, you should check out our tutorial on using ESLint in projects to improve team collaboration through code standards. Maybe you'd just like to start deploying the applications you're about to build? In that case, take a peek at our guide on how to deploy Node.js apps on Linux with systemd!
That said, if you want to keep in touch with Node.js and the surrounding ecosystem, you should go follow @NodeSource on Twitter! We'll keep you updated with important news from the Node.js project, and share the best Node.js tutorials, guides, and tools that the community has to offer.
Read More
Just like any programming language, platform, or library, getting up and running with Node.js takes some initial setup before you can start hacking away. With Node.js, the only initial setup required is, quite simply, getting the binary installed.
In this quick tutorial, we'll take a quick look at how to get Node.js on macOS. Once we've completed the entirety of the tutorial, you'll be ready to take the next step with Node.js.
This guide covers installing Node.js on the following versions of OS X and macOS: OS X 10.10 (Yosemite), OS X 10.11 (El Capitan), and macOS 10.11. These are the versions that are consistently tested and supported by the Node.js build process at the time of writing.
Step 0: The Quick Guide (TL;DR) to Get Node.js Installed on macOS
Here's the abbreviated guide, highlighting the major steps:
- Go to the Node.js Downloads page
- Download Node.js for macOS by clicking the "Macintosh Installer" option
- Run the downloaded Node.js
.pkgInstaller - Run the installer, including accepting the license, selecting the destination, and authenticating for the install.
- You're finished! To ensure Node.js has been installed, run
node -vin your terminal - you should get something likev6.9.4
Step 1: Download the Node.js .pkg Installer
As our first step, we need to actually get the official installer for Node.js on macOS. To do so, we can head over to the Node.js Downloads page to download the installer.
You can get the macOS installer by clicking the Macintosh Installer option - this will download the .pkg installer for Node.js. Make sure you save it somewhere that you'll be able to access it!
Step 2: Run the Node.js Installer
Now that you've got the installer downloaded, you'll need to run it. The installer is a pretty typical interface - it won't take long to get through it (under a minute), even though there are a few parts to it. You can get through it by following the guide below:
-
Introduction
- Select
Continue
- Select
-
License
- Select
Continue - Select
Agree
- Select
-
Installation Type
- Select
Install - Authenticate with your Mac to allow the Installation
- Select
Install Software
- Select
-
Summary
- Select
Close
- Select
Step 3: Verify that Node.js was Properly installed
To verify that Node.js was installed correctly on your Mac, you can run the following command in your terminal:
$ node -v
If Node.js was properly installed, you'll see something close to (but probably not exactly) this:
$ node -v // The command we ran - tests the version of Node.js that's currently installed
v6.9.4 // The version of Node.js that's installed - v6.9.4 was the most current LTS release at the time of writing.
Step 4: Update Your npm Version
As one last step for good measure, we'll update your version of npm.
Node.js always ships with a specific version of npm - Node.js doesn't (and shouldn't!) automatically update npm. The npm releases aren't synced with Node.js releases. Because of this, there's almost always a newer version of npm than the one that is installed by default with a given version of Node.
To easily update your version of npm, you can run the following command:
$ sudo npm install npm --global // Update the `npm` CLI client
Step 6: Start building with Node.js!
Now you've got Node.js on your Mac. It's time to start exploring!
Thankfully, we've got your back. We've got a ton of articles on getting started with Node.js! If you're interested in exploring ES6, you should check out our article on some of the most exciting ES6 features in Node.js. Looking for ways to standardize your JavaScript code across your team? In that case, you should check out our guide to using ESLint to build code standards in Node.js applications. Maybe you'd just like to start deploying your applications? In that case, check out our guide on deploying Node.js apps with systemd!
That said, if you want to keep in touch with Node.js and the surrounding ecosystem, you should go follow @NodeSource on Twitter! We'll keep you updated with important news from the Node.js project, and share the best Node.js tutorials, guides, and tools that the community has to offer!
Read More
This article was first published in NodeSource blog on January 2017.
As with any programming language, platform, or tool, the first step to using it is getting it installed. Many of them typically come with a speedy way to upgrade when a new version is available.
By default, there's not a way to upgrade the version of Node.js you've got from within Node.js itself. That said, there's a fantastic tool for the community called nvm that allows you to manage the versions of Node.js that you've got installed locally.
One awesome aspect of nvm is that it manages the versions of Node.js, it doesn't just upgrade them. This means you can have the latest version of Node.js, the latest versions of all the LTS release lines, and any number of other versions you want to use or test as well.
In this quick tutorial, we'll take a look at how to install nvm, and then how to start using it as your version manager for Node.js. Once we've completed the tutorial, you'll be ready to take the next step with Node.js.
This guide covers installing nvm on macOS and Linux - note that all versions of Node.js may not support every version of macOS or Linux.
Step 0: The Quick Guide (TL;DR) to Get Node.js Installed using nvm
Here's the abbreviated guide, highlighting the major steps:
-
Download the nvm install script via cURL:
curl -o- https://raw.githubusercontent.com/creationix/nvm/v0.33.0/install.sh | bash
- Ensure that nvm was installed correctly with
nvm --version, which should return the version of nvm installed. -
Install the version of Node.js you want
- Install the latest version with
nvm install node - Use the latest version with
nvm use node - Install the latest LTS version with
nvm install --lts - Use the latest LTS verison with
nvm use --lts
- Install the latest version with
Step 1 (Optional): Ensure your system has the appropriate C++ compiler
In some cases, like when installing Node.js releases from their source or installing versions of Node.js before 0.8.6 (when the project started shipping binaries), you'll need to ensure that your system has the appropriate C++ build tools.
For LTS and modern releases, you will not need this step. That said, it's a nice to have to ensure that the majority of requirements are met in any scenario.
On macOS, you've got two options for a C++ compiler: the full XCode application or the stand-alone Command Line Tools portion of Xcode.
To get these on macOS, you can follow these steps:
- Open your terminal of choice
-
Run
xcode-select --installas a command- A popup will appear
- Select
Install
- Allow the download to run to completion
- If the installation went uninterrupted, you should have the necessary tools to use nvm!
On Linux, the C++ compiler will vary from distribution to distribution. For example, on Debian and Ubuntu, you'll need to install build-tools and libssl-dev, but this may be different on your given Linux distribution.
To get build-tools and libssl-dev on Debuan and Ubuntu distributions, you can run these commands:
sudo apt-get install build-essential # Install the build-essential package - let this run to completion

sudo apt-get install libssl-dev # Install the libssl-dev package - also let this one run to completion
Step 2: Download nvm with the install script
Once you've got the right C++ compiler for your system, now it's time to run the nvm install script. Here are the single-step install scripts for both macOS and Linux. You've got the option of cURL or Wget but both achieve the same result.
Note: If your Linux system doesn't have either cURL or Wget, you can run sudo apt-get install curl and use the cURL method.
Running the Install Script with cURL:
To install nvm with the cURL method, run the following command in your terminal:
curl -o- https://raw.githubusercontent.com/creationix/nvm/v0.33.0/install.sh | bash
Using the Install Script with Wget:
To install nvm with the Wget method, run the following command in your terminal:
wget -qO- https://raw.githubusercontent.com/creationix/nvm/v0.33.0/install.sh | bash
Step 3: Verify that nvm was Properly installed
After running the install script from Step 2, nvm should have successfully installed. To ensure that nvm is up and running on your machine, you can test it with the following command:
nvm --version
This command will return something like (though not necessarily exactly) the following:
nvm --version # The command we ran - it checks the currently installed version of nvm
0.33.0 # The current version of nvm - yours may differ!
Missing the nvm command after running the install script?
If you're using macOS, you may be missing a .bash_profile file - to troubleshoot this, you can run touch ~/.bash_profile in your command line and re-run the installer script.
If the problem persists after that, you can open the existing .bash_profile file (using your favorite text editor) and add the following line to it:
source ~/.bashrc
If you're still having issues, you can take a peek at this issue to find a discussion of the problem and a collection of possible resolutions.
Step 3: Using nvm to manage Node.js
Congratulations! You've now got nvm - a tool to easily allow you to manage and swap out the versions of Node.js you've got installed locally. Now, let's get you started with doing just that.
Install the latest Node.js version
To install the latest available version of Node.js, you can use the following command:
nvm install node
Next, to use that version of Node.js in any new shell, you can simply run the use command:
nvm use node
Install the latest Node.js LTS version
To install the latest available LTS version of Node.js, you can run the following command:
nvm install --lts
And to use that latatestTS version of Node.js in any new shell, you can simply run the use command:
nvm use --lts
Step 6: Go build applications, APIs, tools, and more with Node.js!
Now you've got a fantastic version manager for Node.js. It's time to start building!
We've got some resources to get you kickstarted! Both the breadth and depth of the Node.js and the JavaScript ecosystems are quite large - in addition to the developer tools like NodeSource N|Solid and Certified Modules, we've got a ton of tutorials, guides, and articles to help you get kick started with Node.js.
If you're interested in keeping your code clean, maintainable, and collaborative, take a peek at our post on using ESLint for linting your JavaScript applications. Are you interested in building web applications with Node.js? One of the most challenging aspects of web apps is security - you can learn security best practices for Express to lock down your web apps, to prevent breaches and attacks. Or, maybe you want to deploy your Node.js apps with Docker? Then you should definitely read our article on dockerizing your Node.js applications.
That said, if you want to keep in touch with the Node.js ecosystem, you should follow @NodeSource on Twitter! We'll keep you updated with important news from the core Node.js project, fresh and useful Node.js tutorials, and more.
Read More